How to create & manage Tracker tickets
Learn how to create Tracker tickets, manage statuses, communicate with customers, edit details, and link to other tickets.
Written By Markus from Featurebase
Last updated 3 months ago
Overview
Tracker tickets let you group multiple conversations and Customer tickets under a single shared issue – such as a bug report, outage, or feature request affecting multiple customers.
There are several ways to create and link Tracker tickets:
Link or create a Tracker ticket from a conversation – to connect a conversation to an existing shared issue, or start a new one
Create a Tracker ticket via the API – to create tickets programmatically from your app or systems
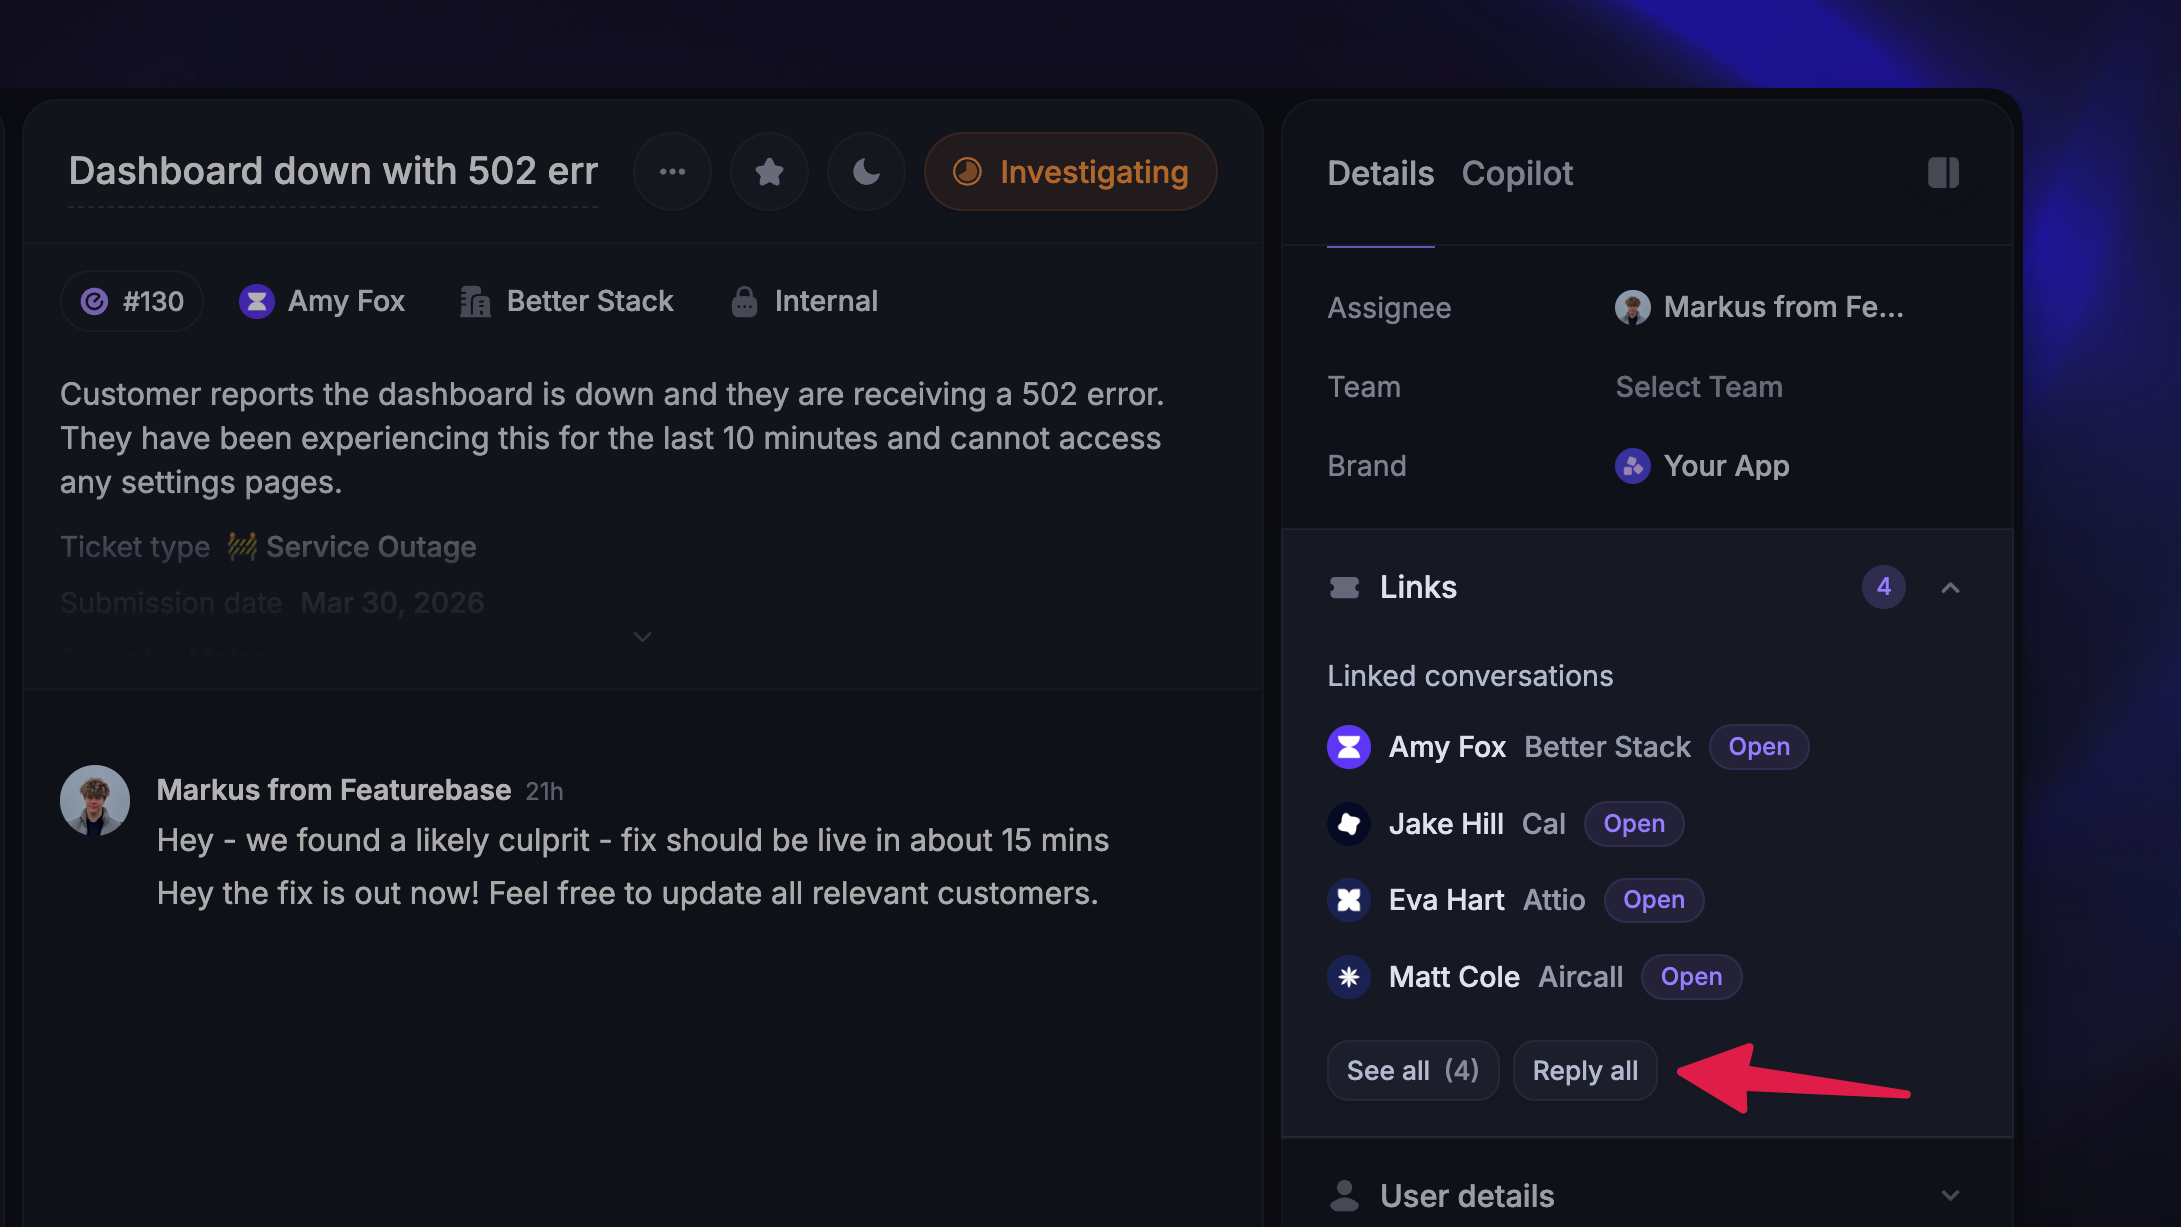
Once a ticket is created, you can manage it directly from the Inbox – change statuses, add and cross-post notes, reply to all linked conversations, and view linked conversations.
Before you can create Tracker tickets, you'll need to set up at least one Tracker ticket type →
Good to know
Tracker tickets are always internal – they are never visible to customers and do not trigger customer notifications
Each conversation can be linked to only 1 Tracker ticket
A single Tracker ticket can be linked to unlimited conversations
Only internal notes are available on Tracker tickets. Replies are not supported since the customer has no visibility
When a Tracker ticket's status changes, a status update is automatically sent to all linked conversations
Notes added to a Tracker ticket can be cross-posted to linked conversations, so front-office teammates stay informed
You can reply to all linked conversations at once from a Tracker ticket using the Reply all button
Creating Tracker tickets
Link or create a Tracker ticket from a conversation
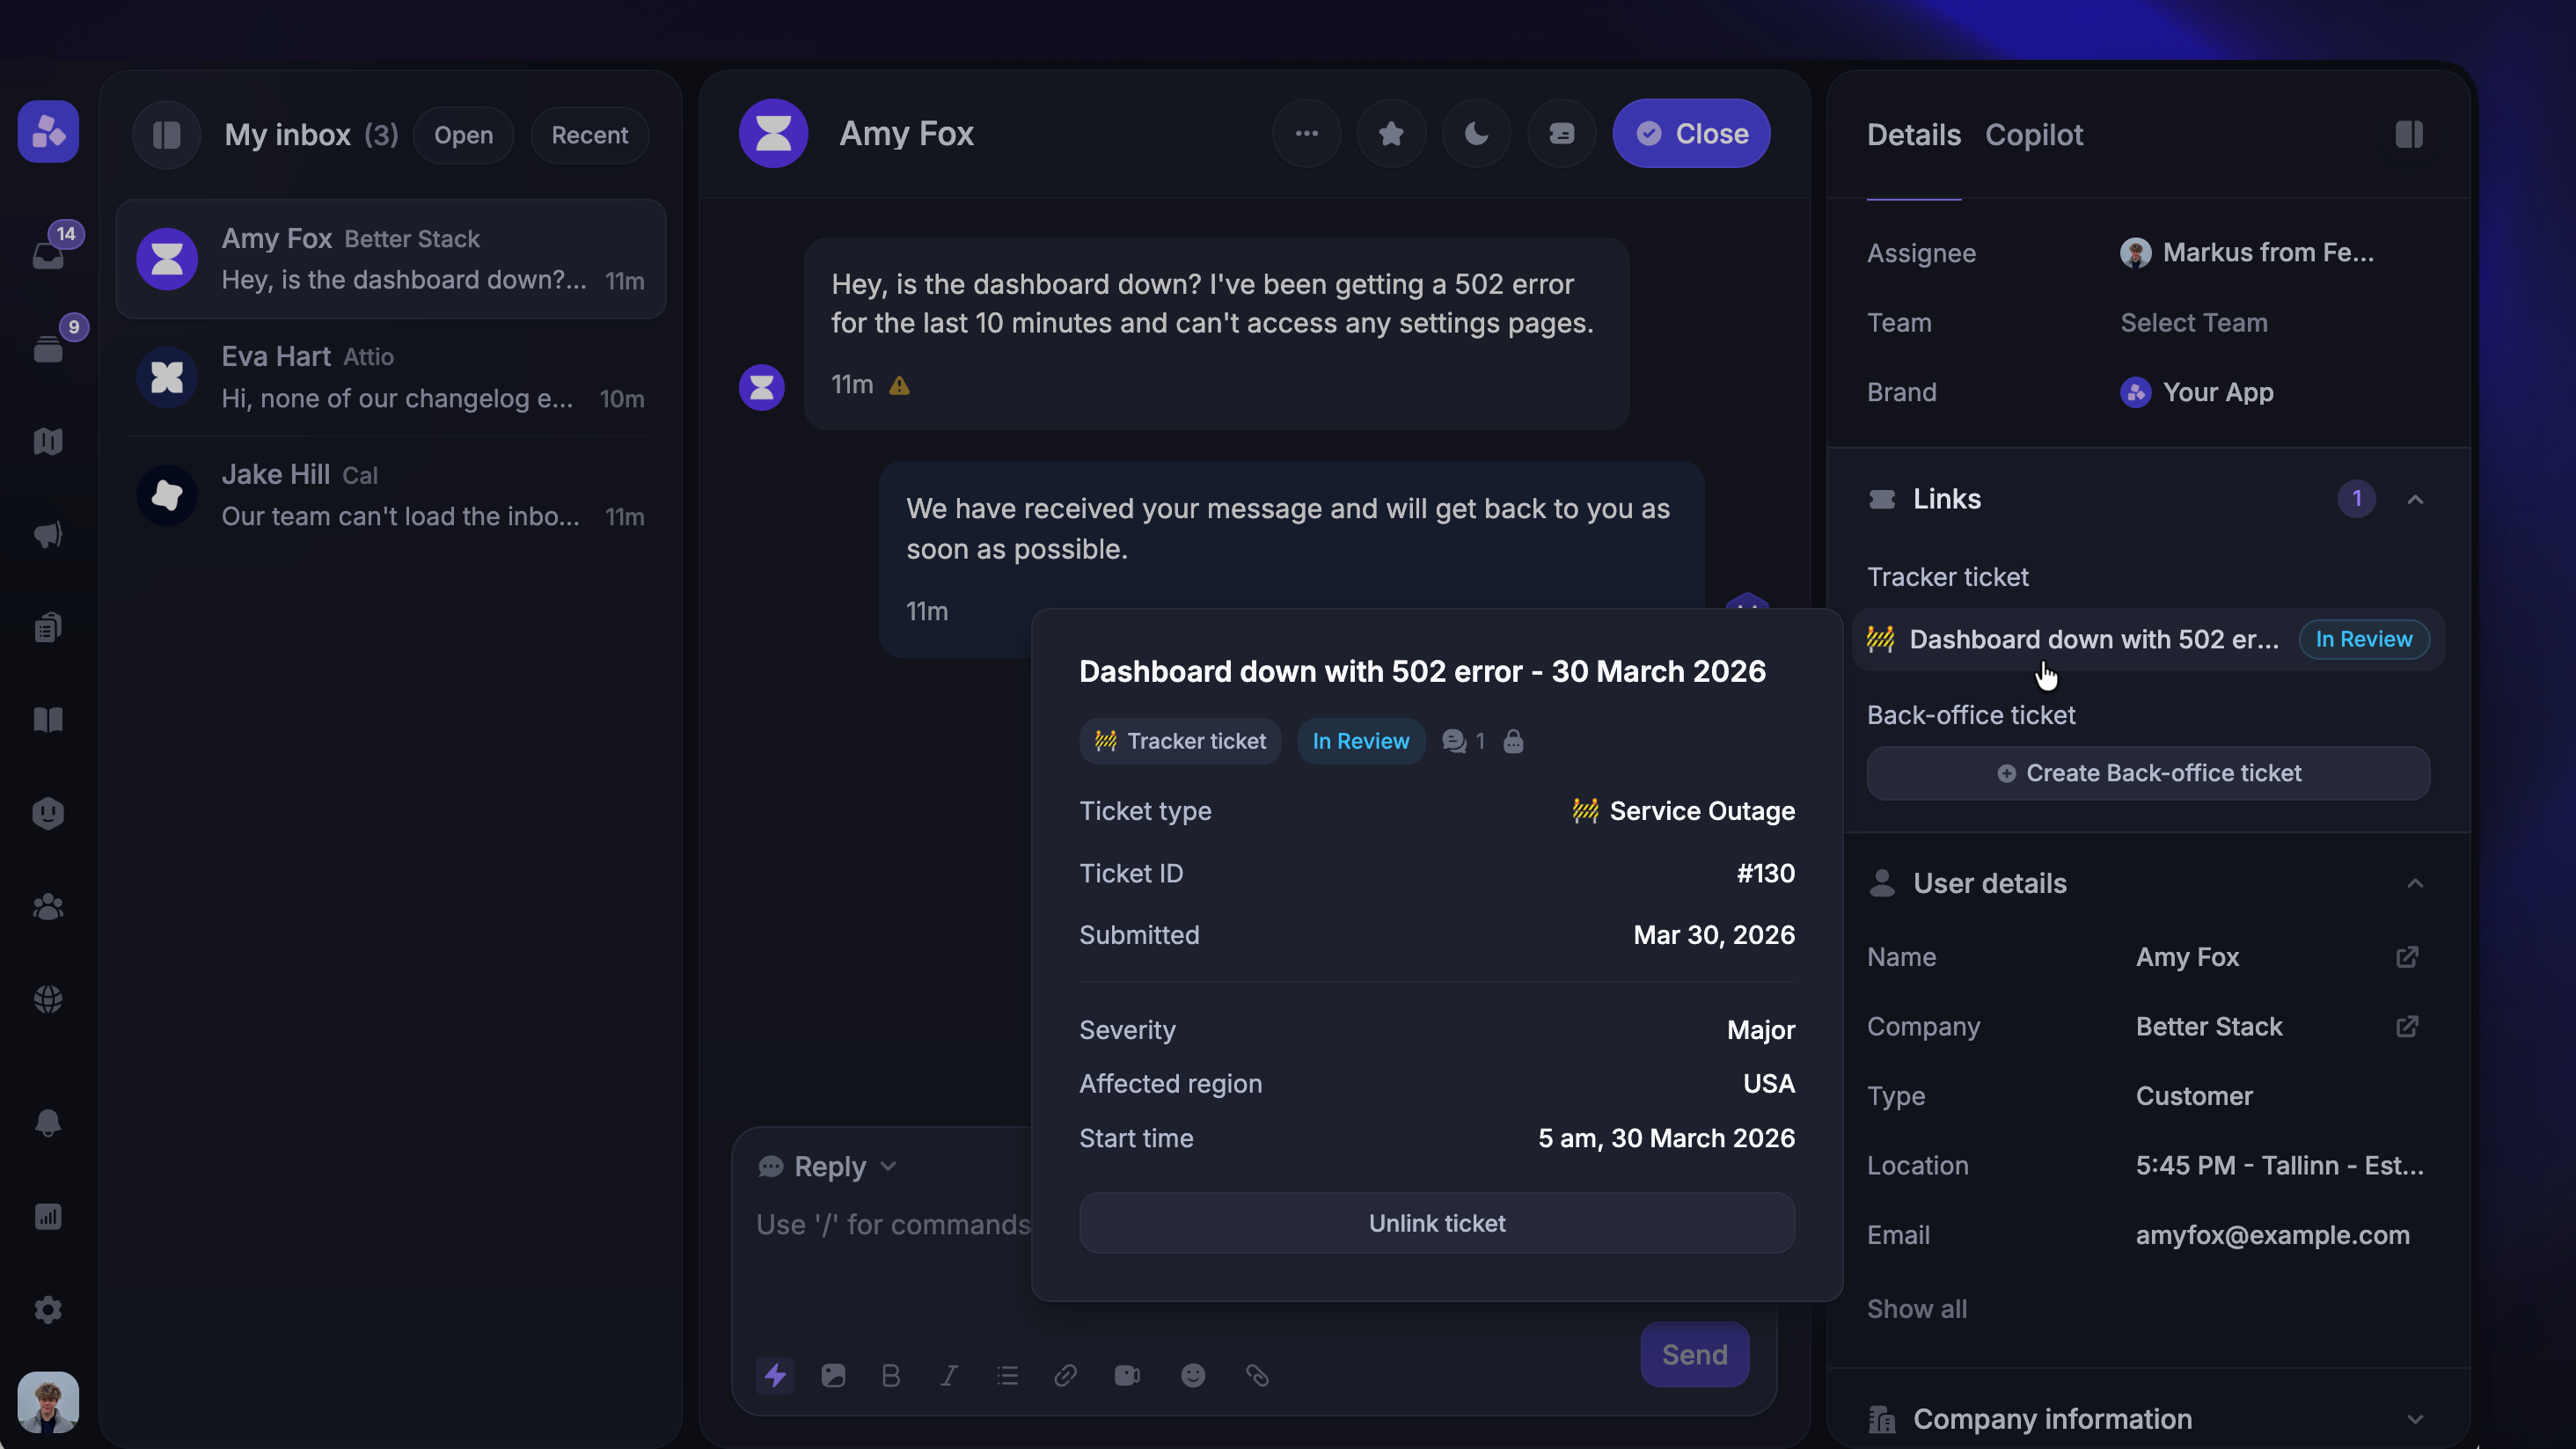
You can link a conversation to a Tracker ticket directly from the right-hand sidebar:
Click Link Tracker ticket under the Links section. You can also open the command palette with
CMD+K/CTRL+Kand select Link tracker ticketA search panel opens with two tabs:
Internal – shows existing Tracker tickets, sorted by last updated
Public – shows public feedback posts from your feedback portal (e.g. Feature requests)
Select an existing ticket to preview its title, description, status, and number of linked customer reports
Click Link to conversation
If a Tracker ticket doesn't exist yet, click the create button top right to start a new one.
Once linked, the Tracker ticket appears in the Links section of the original conversation. You can hover over it to see details or click it to open a side-by-side preview.
Note: Featurebase uses AI to auto-fill the ticket title, description, and custom fields based on the conversation context. You can review and edit the prefilled values before submitting.
Create a Tracker ticket via the API
You can programmatically create Tracker tickets using the Featurebase API (POST /v2/tickets). This is useful when you want to:
Create tickets from external systems or monitoring tools
Automate ticket creation based on events in your app (e.g. error spikes or outage alerts)
Migrate tickets from another tool
Set the ticketCategoryId to a Tracker ticket type. The linkedConversationId field is optional – you can create standalone Tracker tickets and link conversations later.
To learn more, visit the API documentation.
Managing Tracker tickets
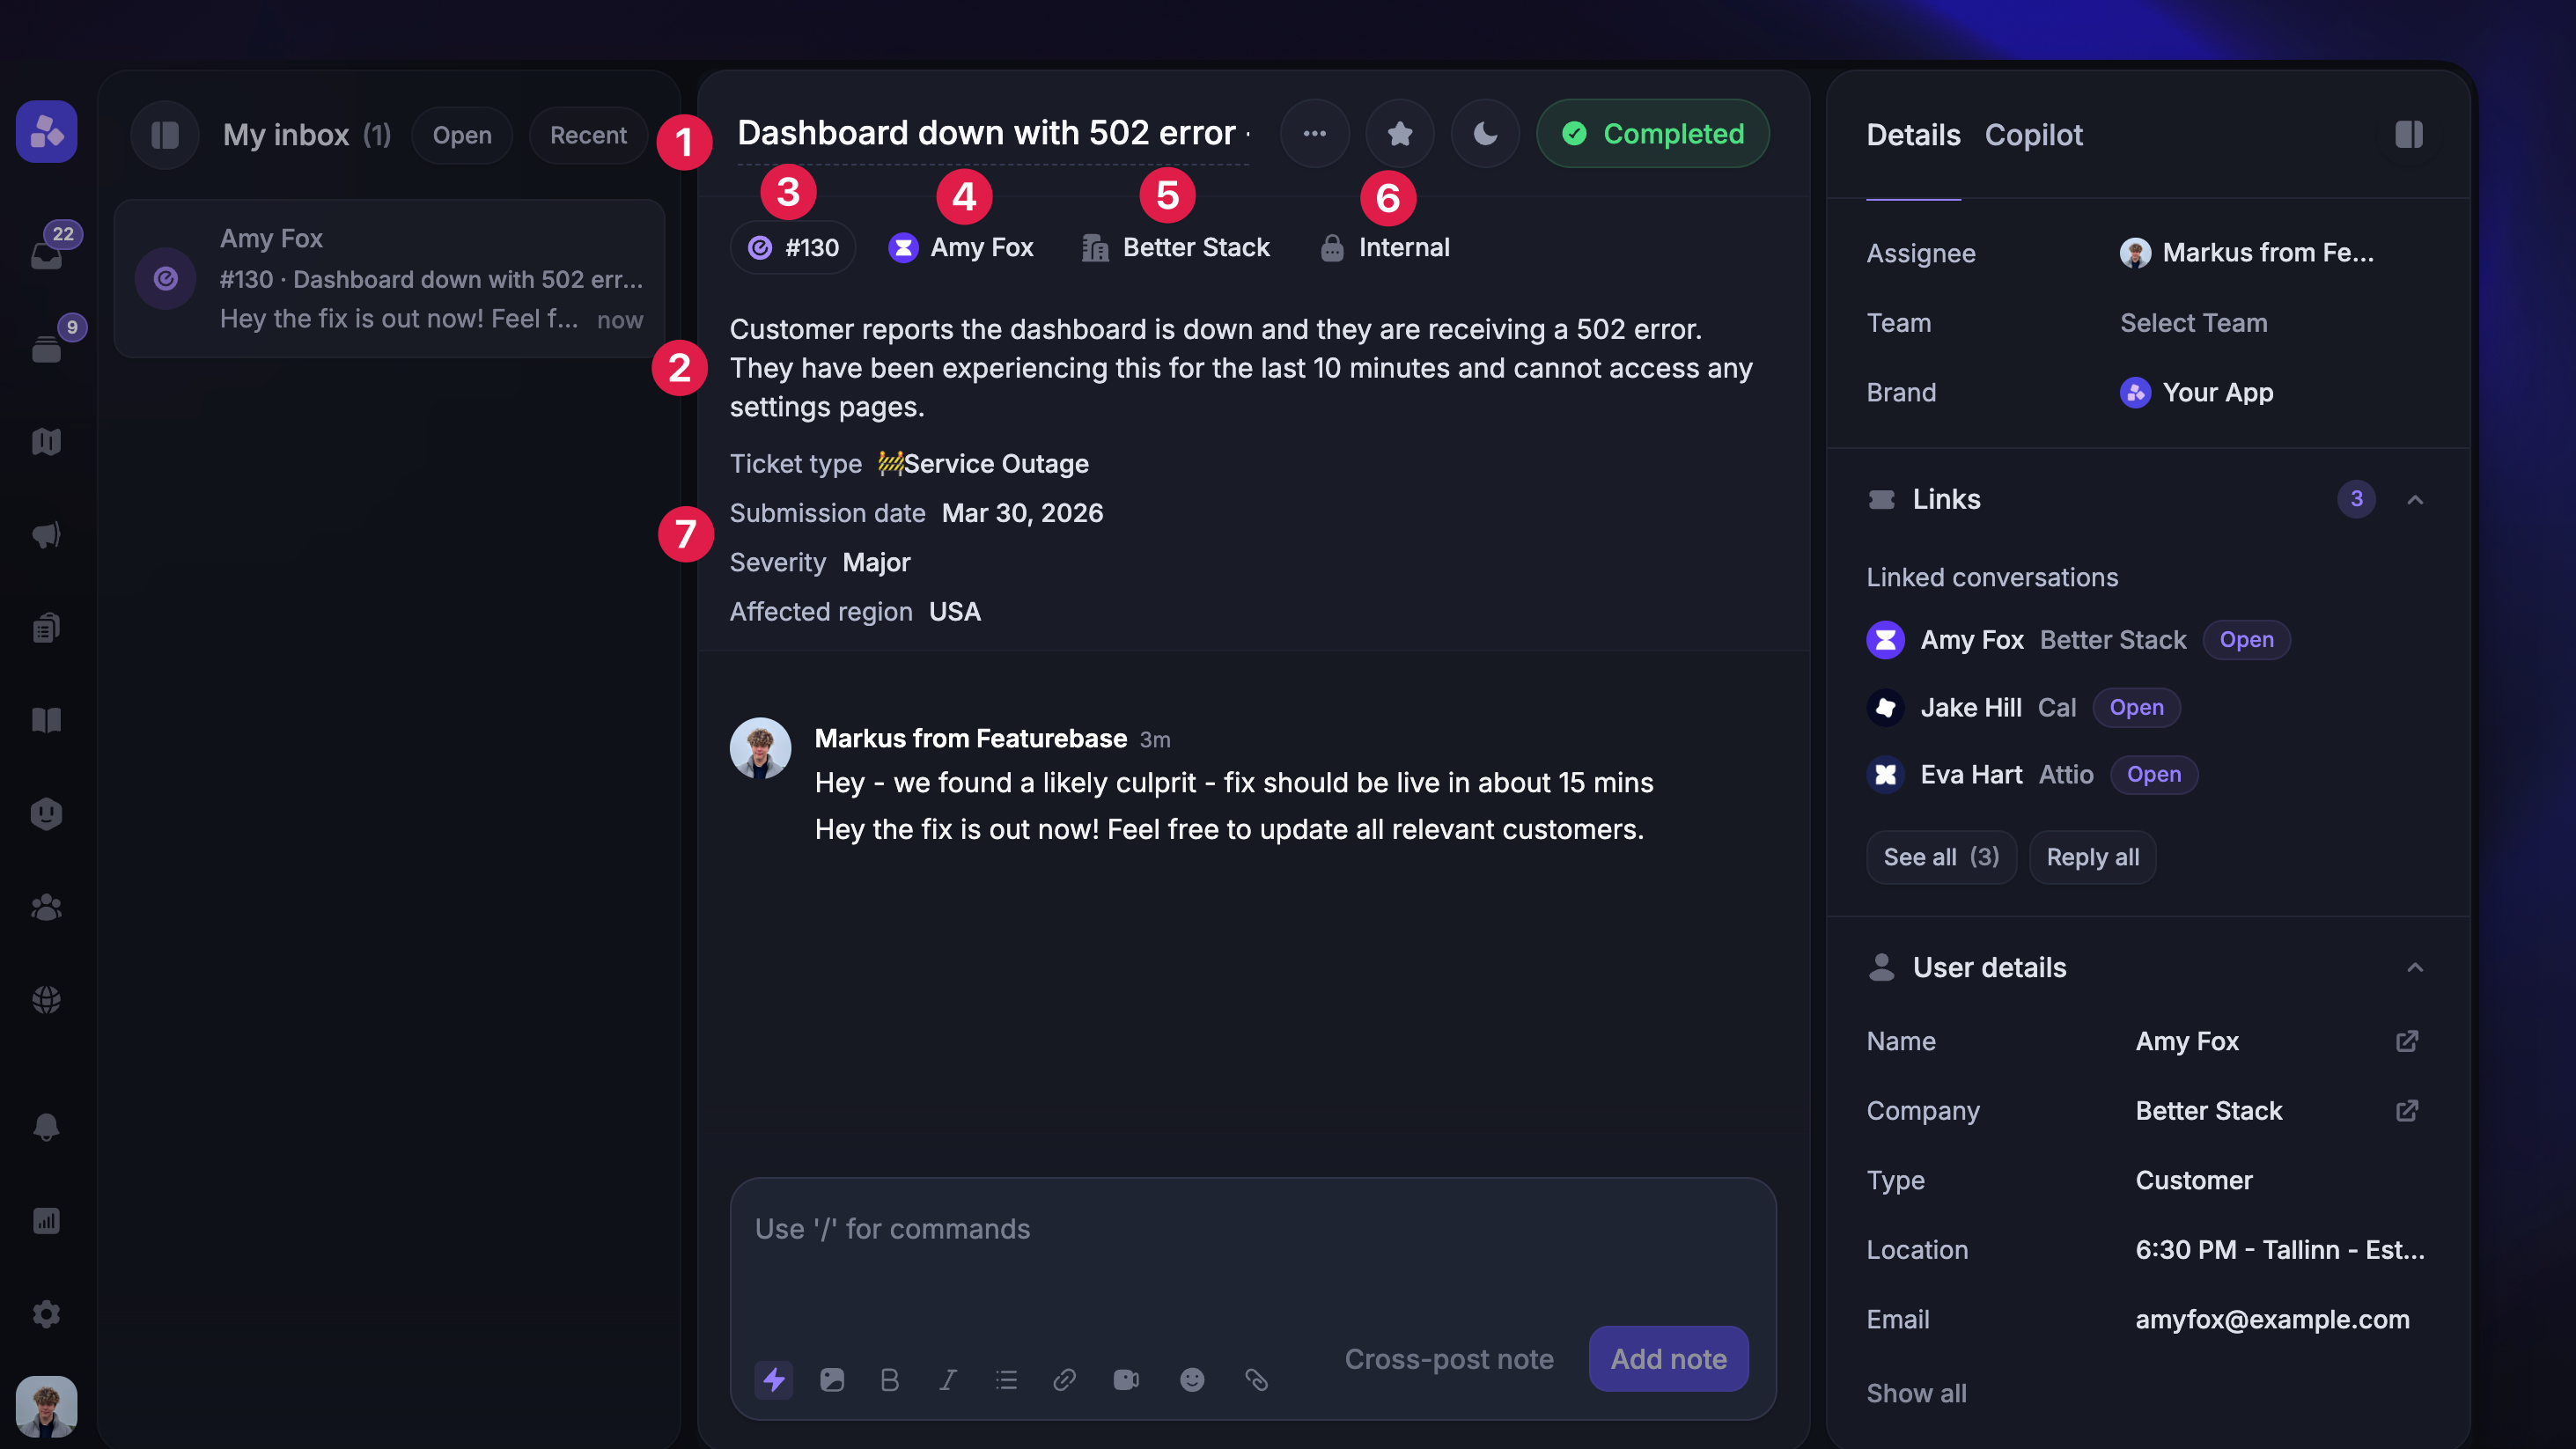
Once a Tracker ticket is created, you can manage it directly from the Inbox. To help your team differentiate between Customer tickets, Back-office tickets, Tracker tickets, and regular conversations, the Inbox shows visual indicators for each type.
Tracker tickets always have the following default fields visible in the middle panel:
Ticket title (click to edit)
Ticket description (click to edit)
Internal ticket ID (click to copy)
User
User's company
Visibility label (Tracker tickets are always internal)
Custom fields (click to edit)
On the right-hand sidebar, you’ll see:
Linked conversations section shows all connected conversations with a count
A Reply all button to send a reply to all linked conversations at once
Changing the ticket status
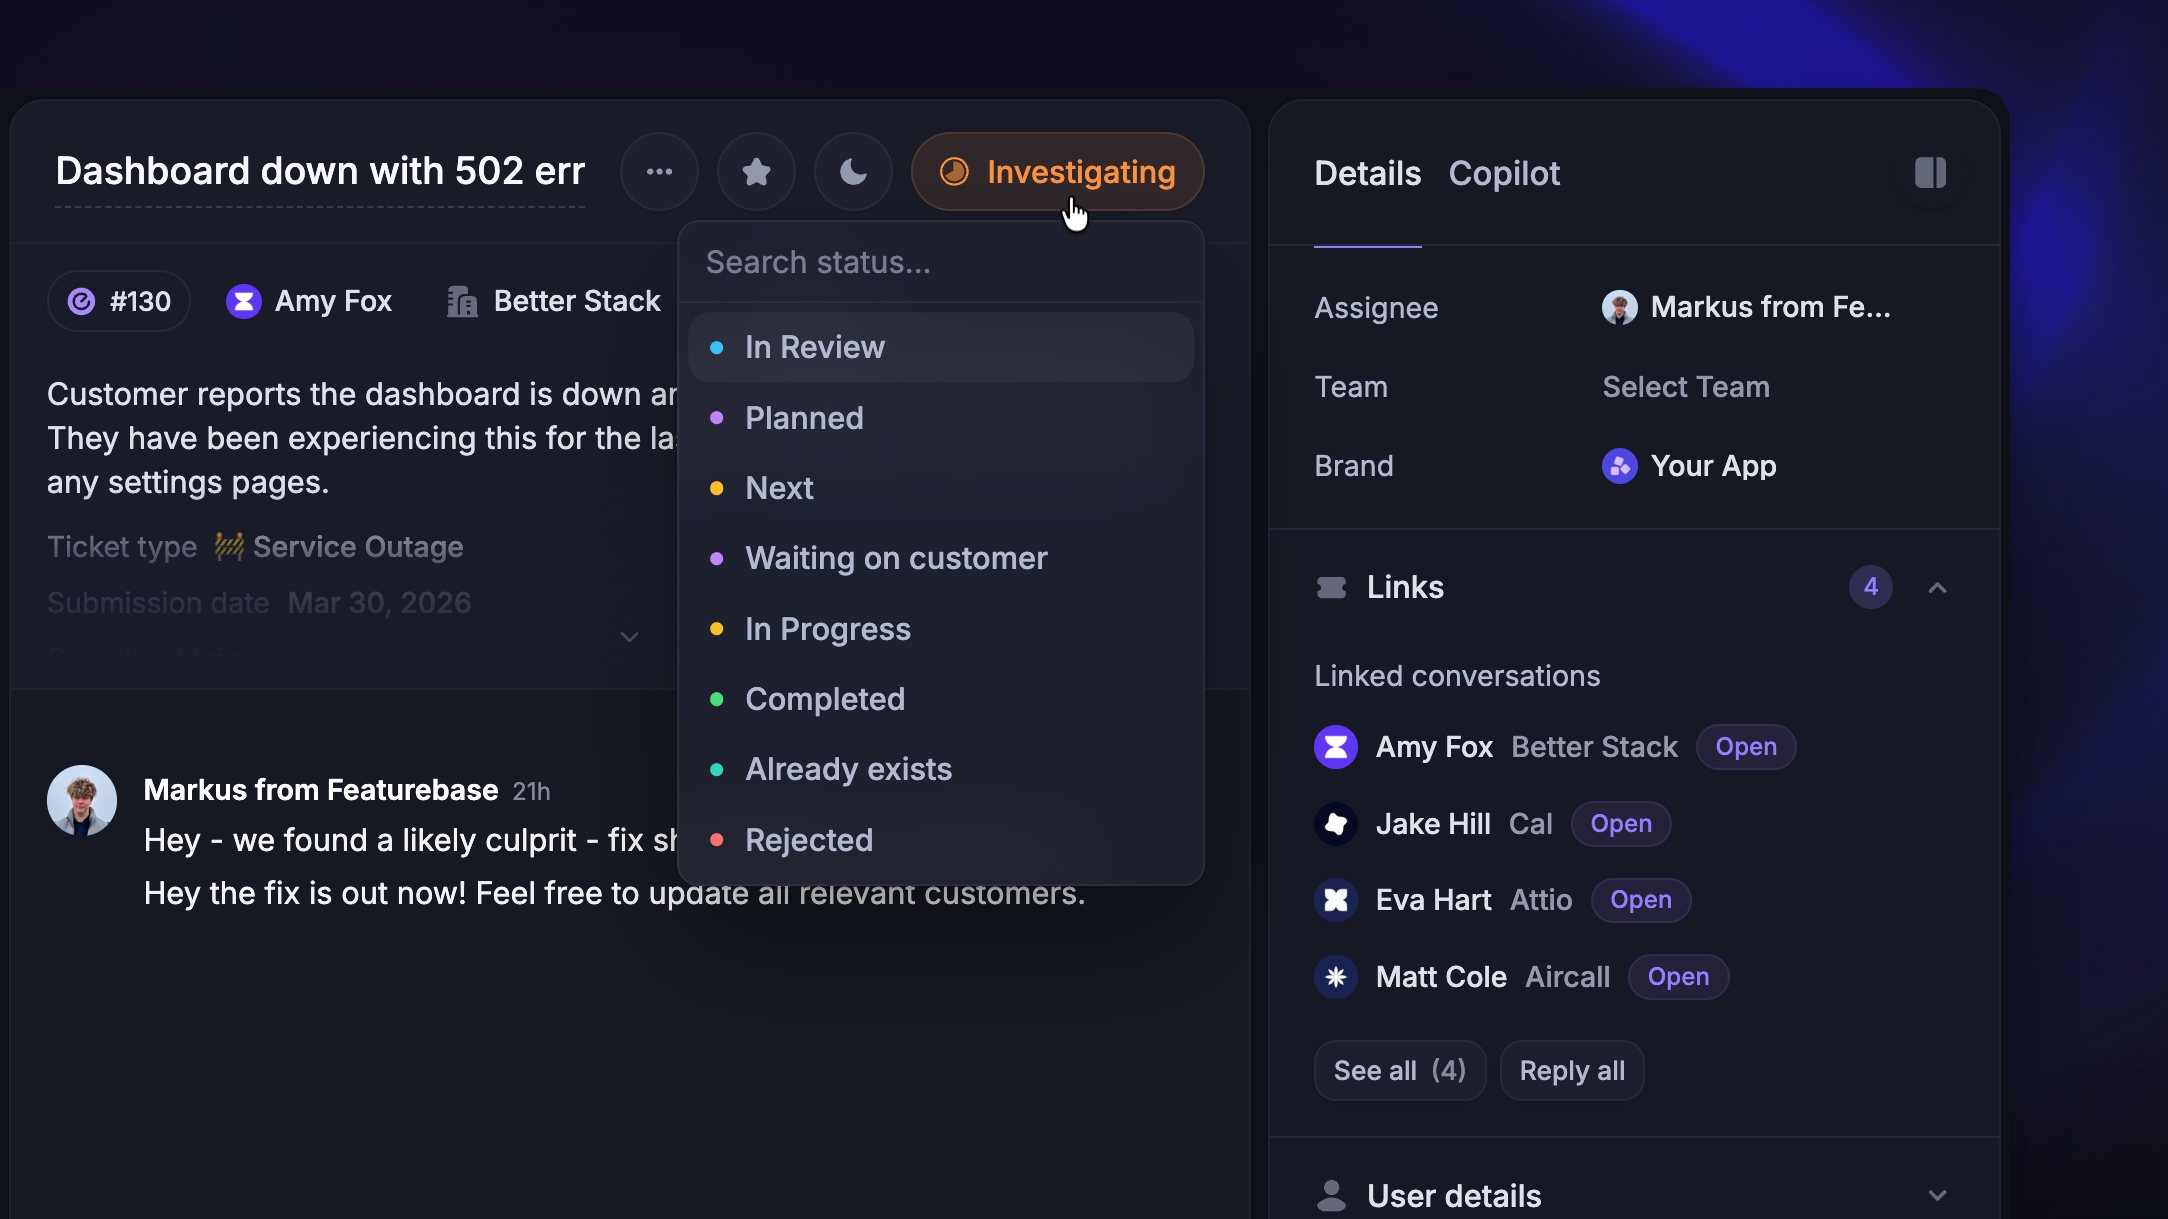
You can change a Tracker ticket's status directly from the conversation header using the status dropdown.
If the Tracker ticket has Customer tickets linked to it, you'll be prompted to update their status too. You can choose to:
Update Customer ticket states – applies the new status to all linked Customer tickets where the status is valid
Continue without updating – only updates the Tracker ticket
When the status changes, an internal status update note is posted to all linked conversations so teammates can see the progress:
Note: You can customize the ticket states for all ticket types separately from their own settings in Settings → Support → Ticketing → Ticket types tab.
Adding notes
Tracker tickets mainly support internal notes – there's no option to send customer-facing replies in the editor.
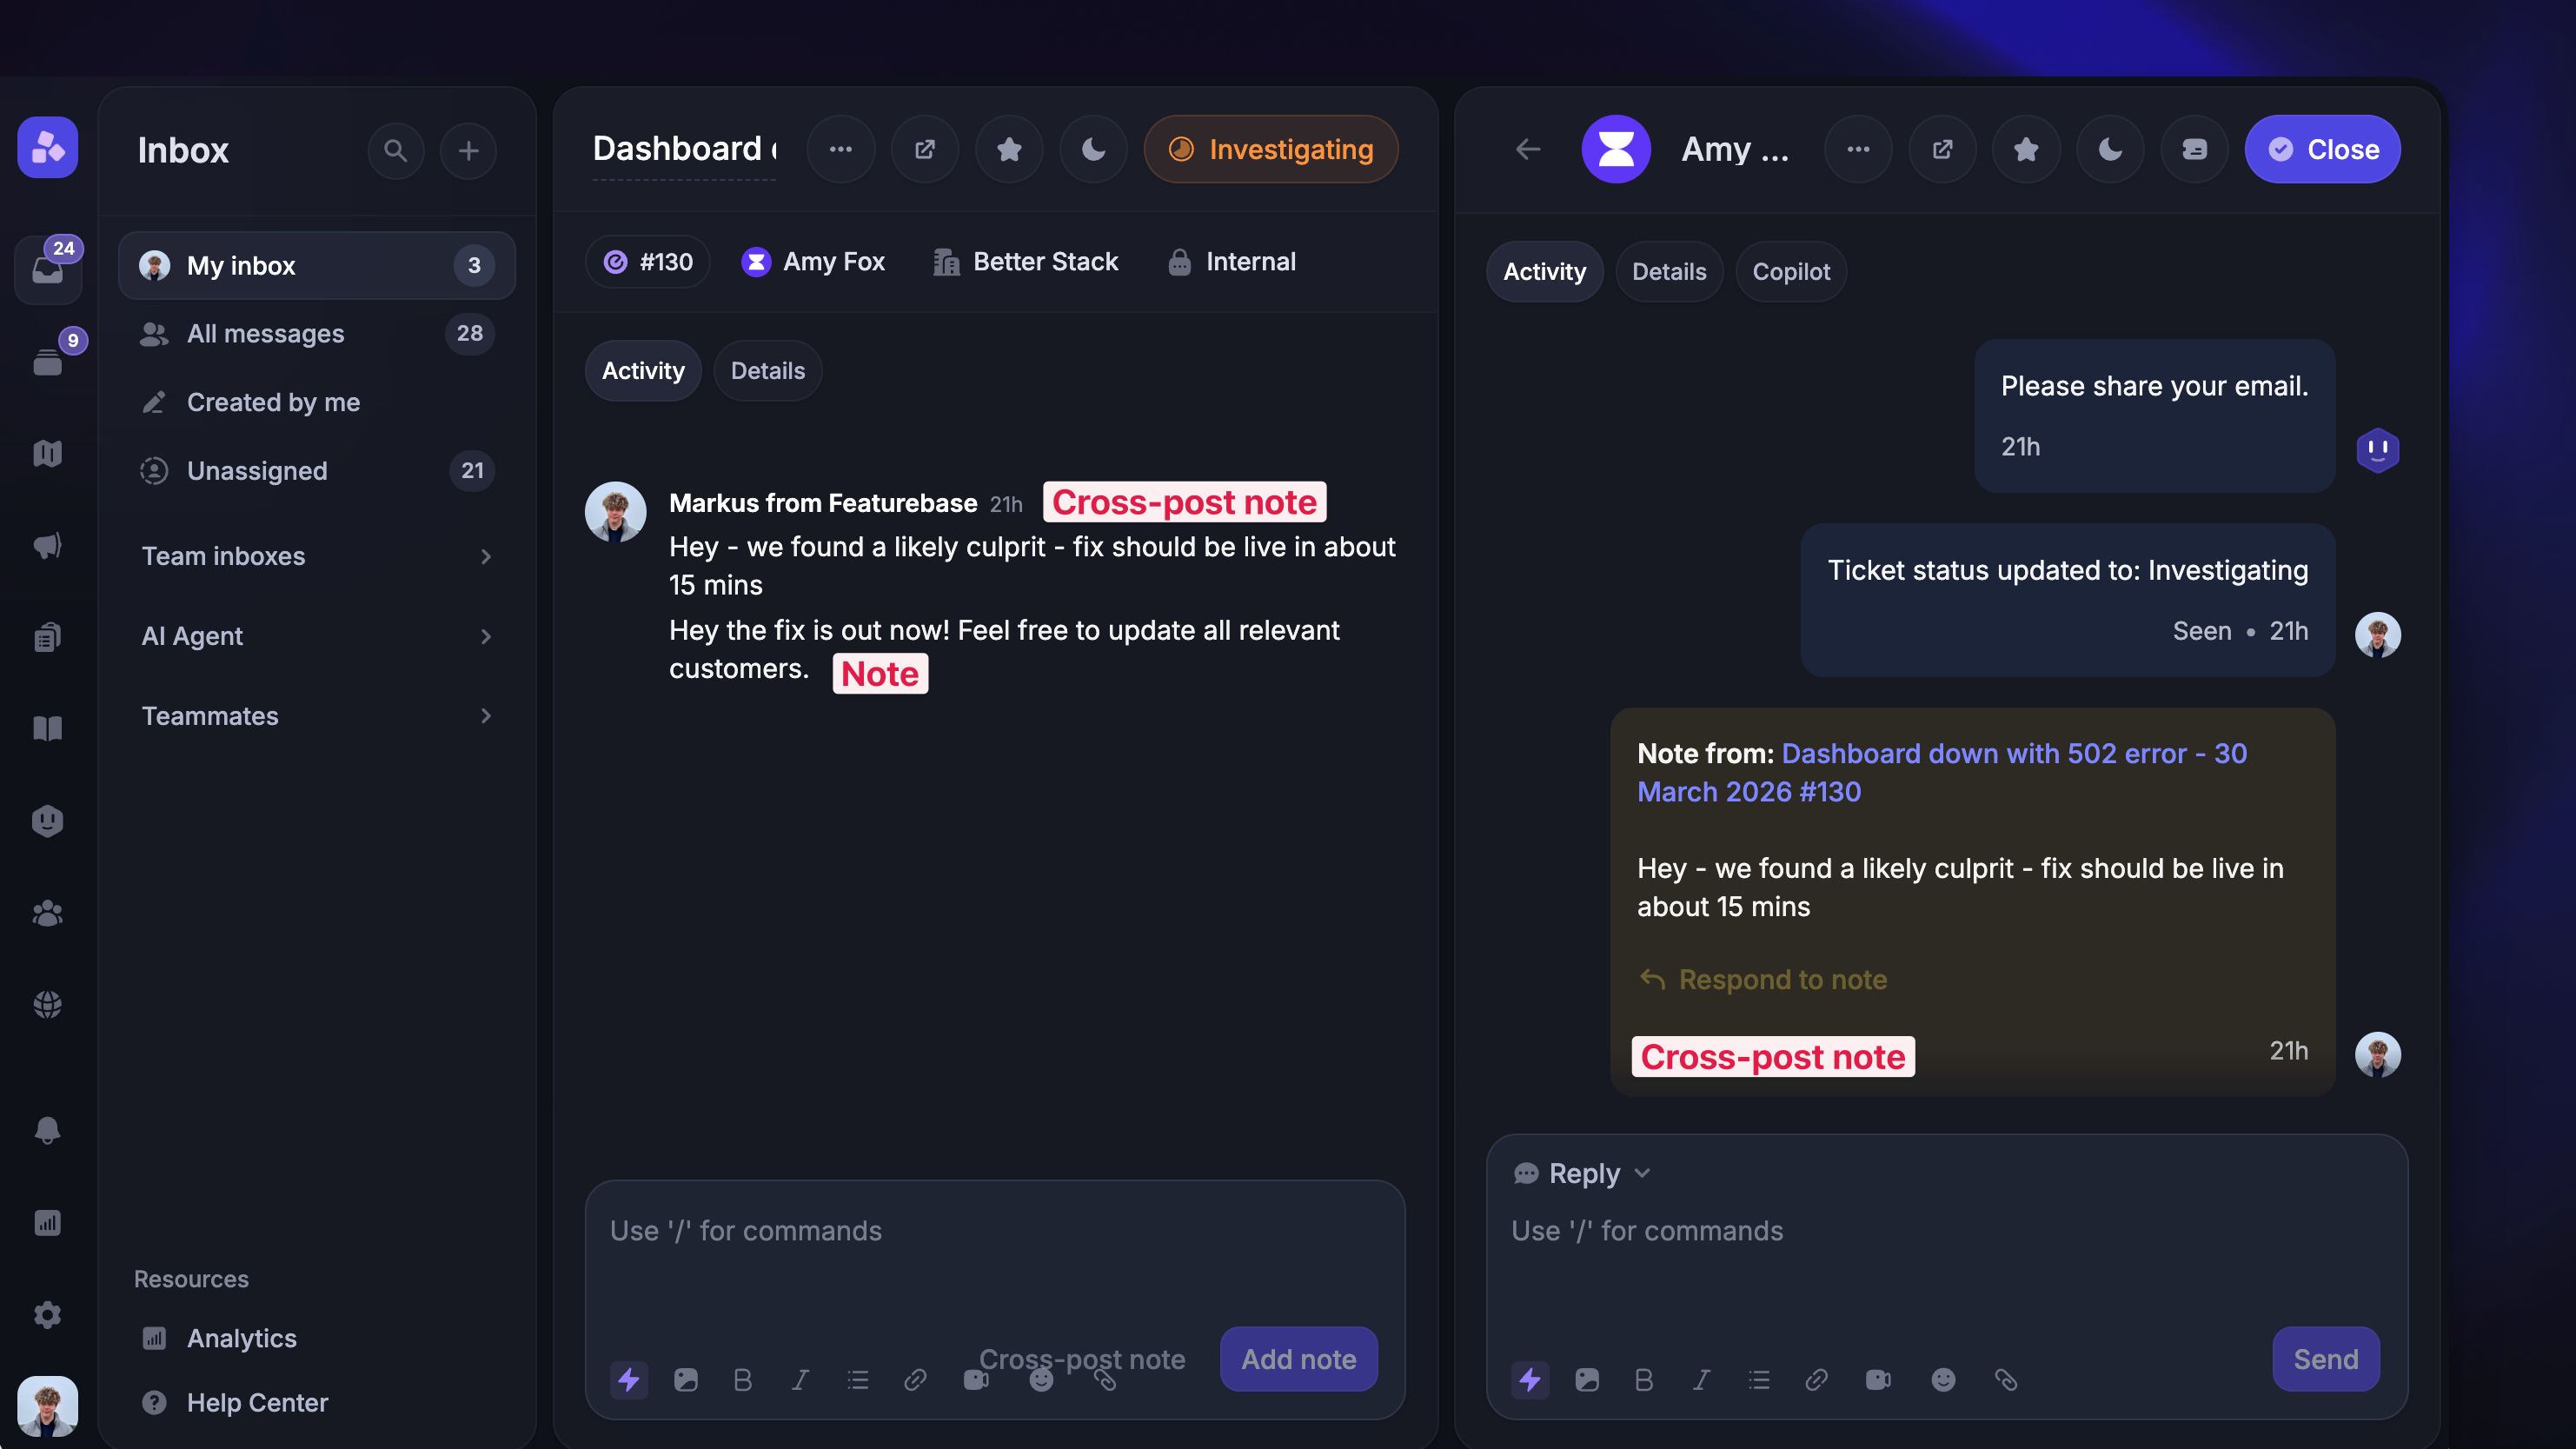
When a Tracker ticket is linked to one or more conversations, you'll see two options in the message editor:
Add note – adds the note to the Tracker ticket being worked on
Cross-post note – adds the note to the Tracker ticket and cross-posts it as an internal note to all linked conversations and Customer tickets
Cross-posted notes appear in linked conversations with a Note from: [ticket title] header and a ↖Respond to note link that navigates back to the Tracker ticket.
Tip: Use cross-posting when you need to share an internal update with all teammates working on linked conversations – for example, when you have a fix timeline for a bug affecting multiple customers.
Replying to all linked conversations
You can also send customer-facing replies to all linked conversations / Customer tickets at once using Reply all.
In the right-hand sidebar, under the Linked conversations section
Click Reply all
From here, you can type in your message and also choose from any bulk actions to apply alongside your reply:
Assign to a person
Assign to a team
Set as a priority
Snooze
Close
Click Reply all to send
The reply is sent as a customer-facing message to all linked conversations (excluding the current Tracker ticket conversation itself).
Note: This is different from cross-posting notes. Cross-post sends an internal note visible only to teammates, while Reply all sends a customer-visible reply to the linked conversations.
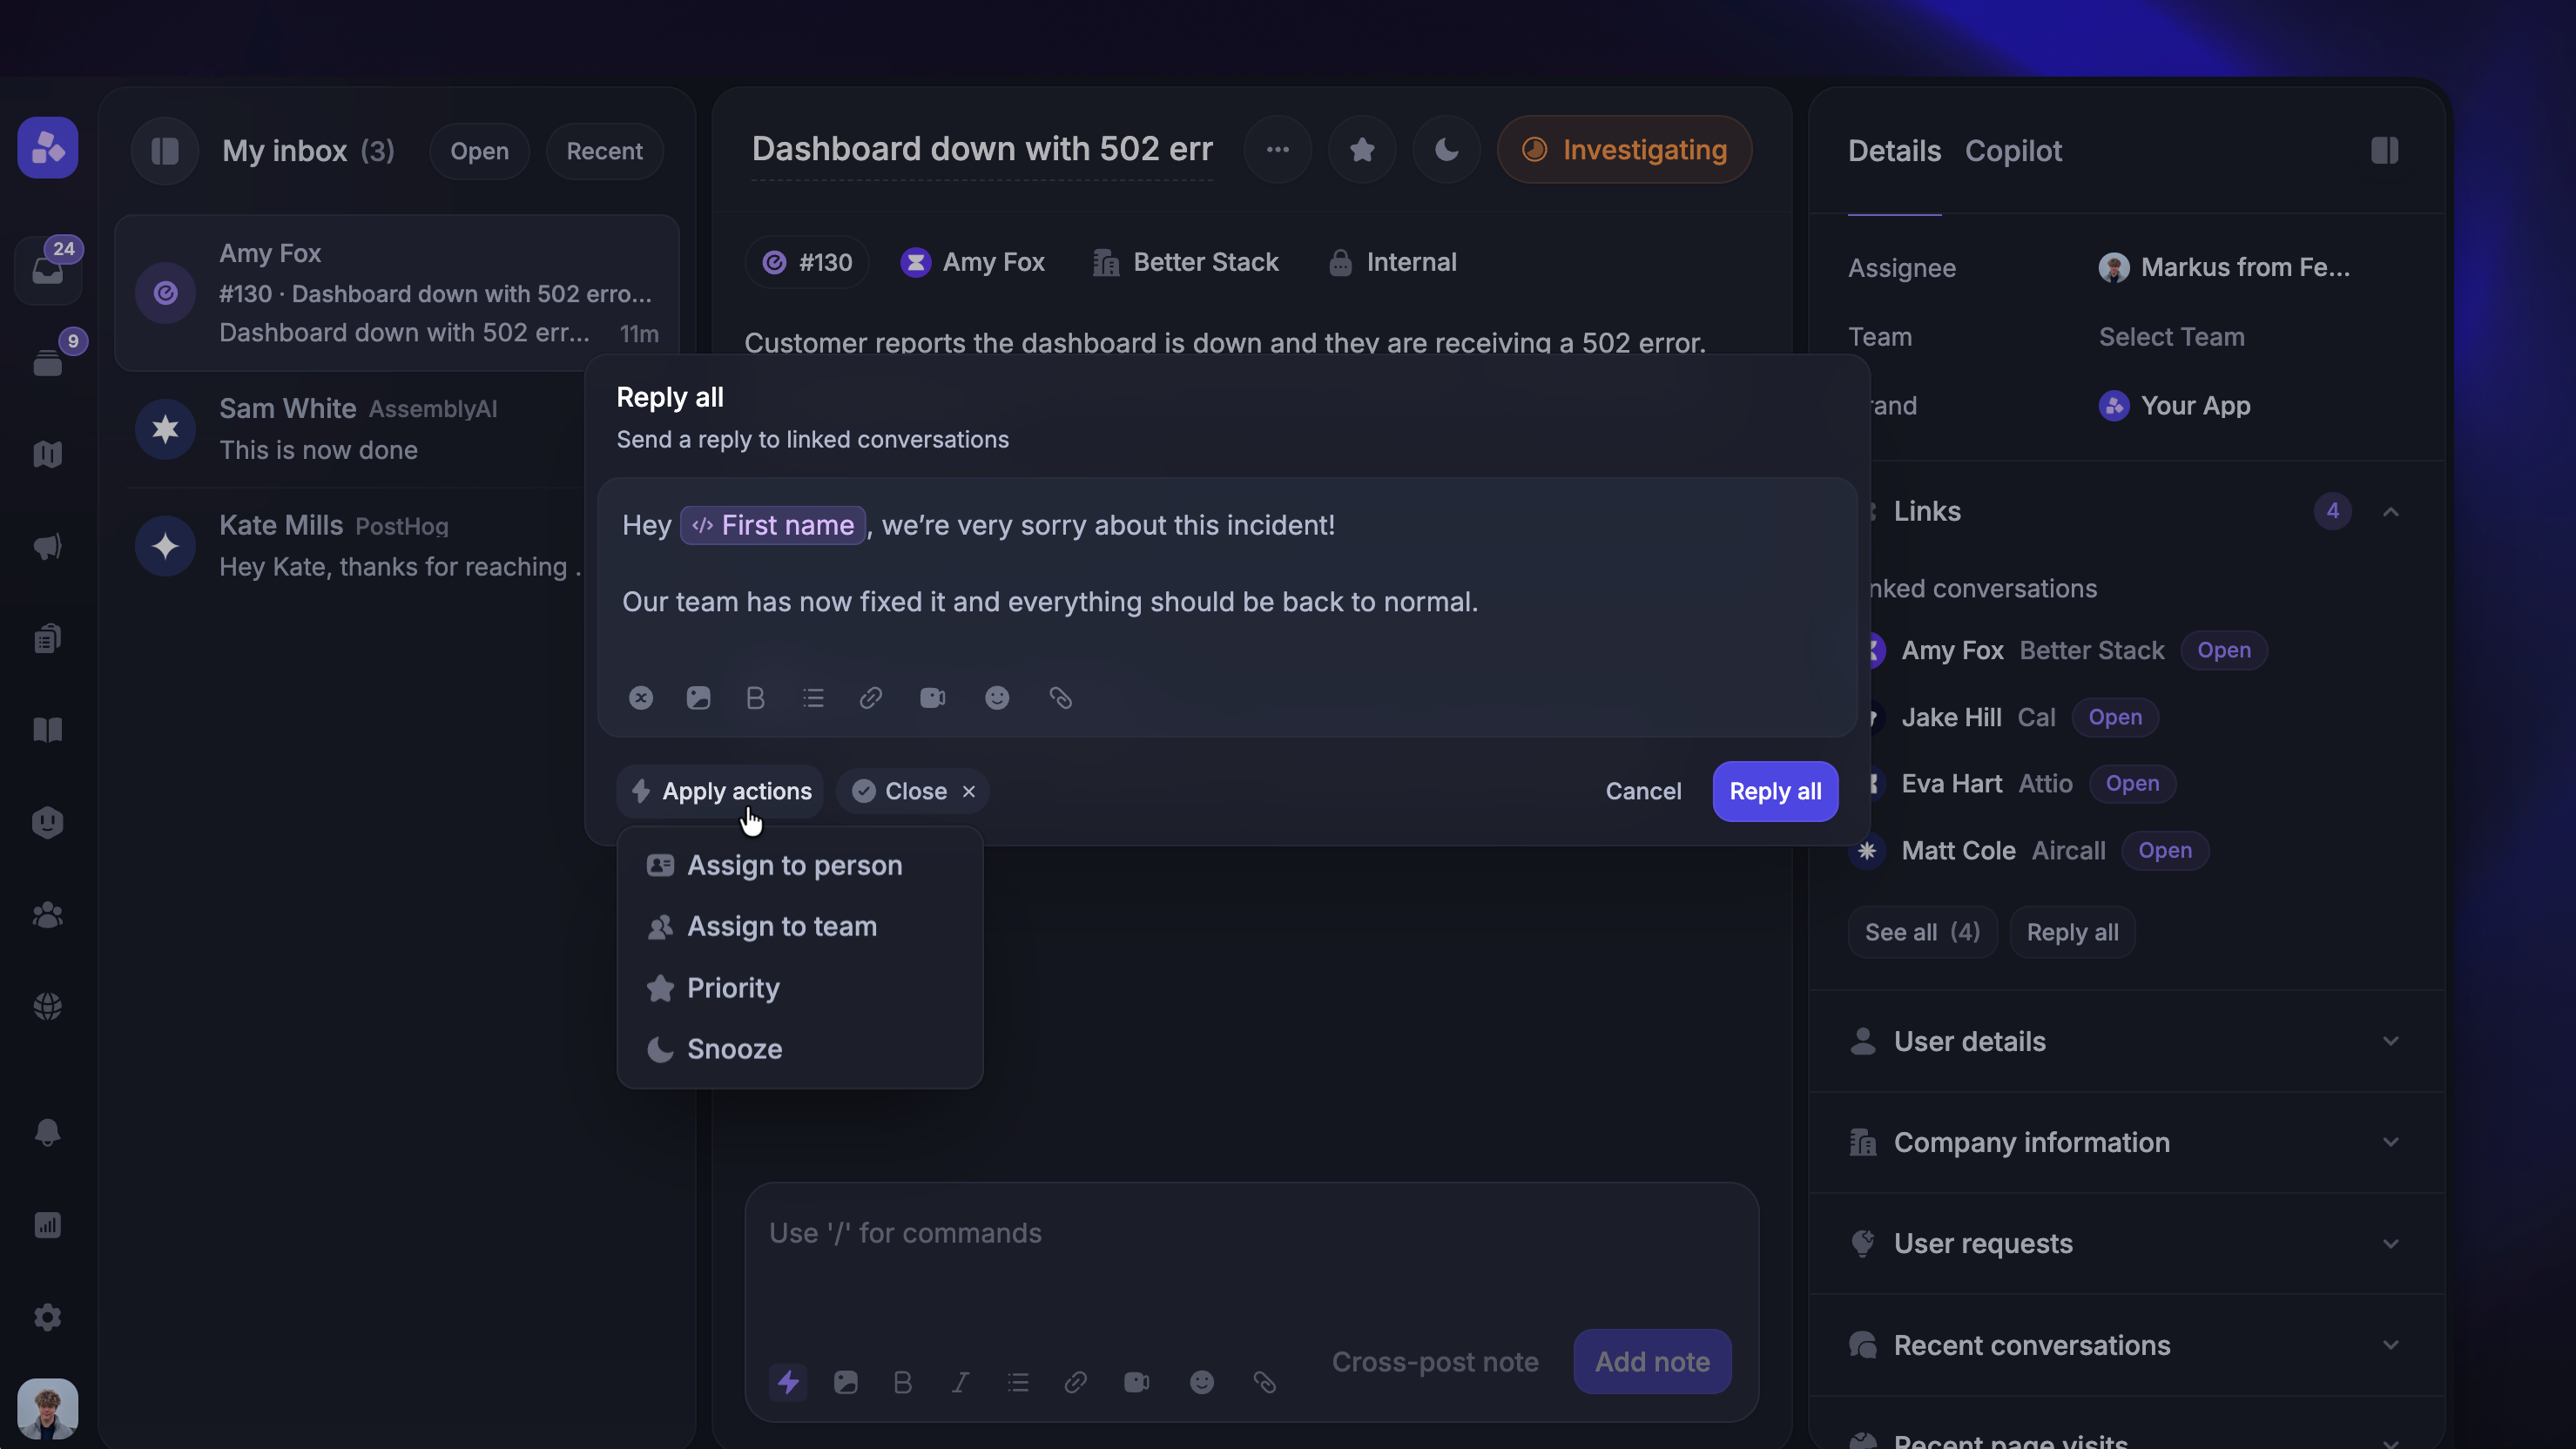
Tip: You can use Dynamic variables such as {first_name} to keep update messages personal at scale.
Viewing and managing linked conversations

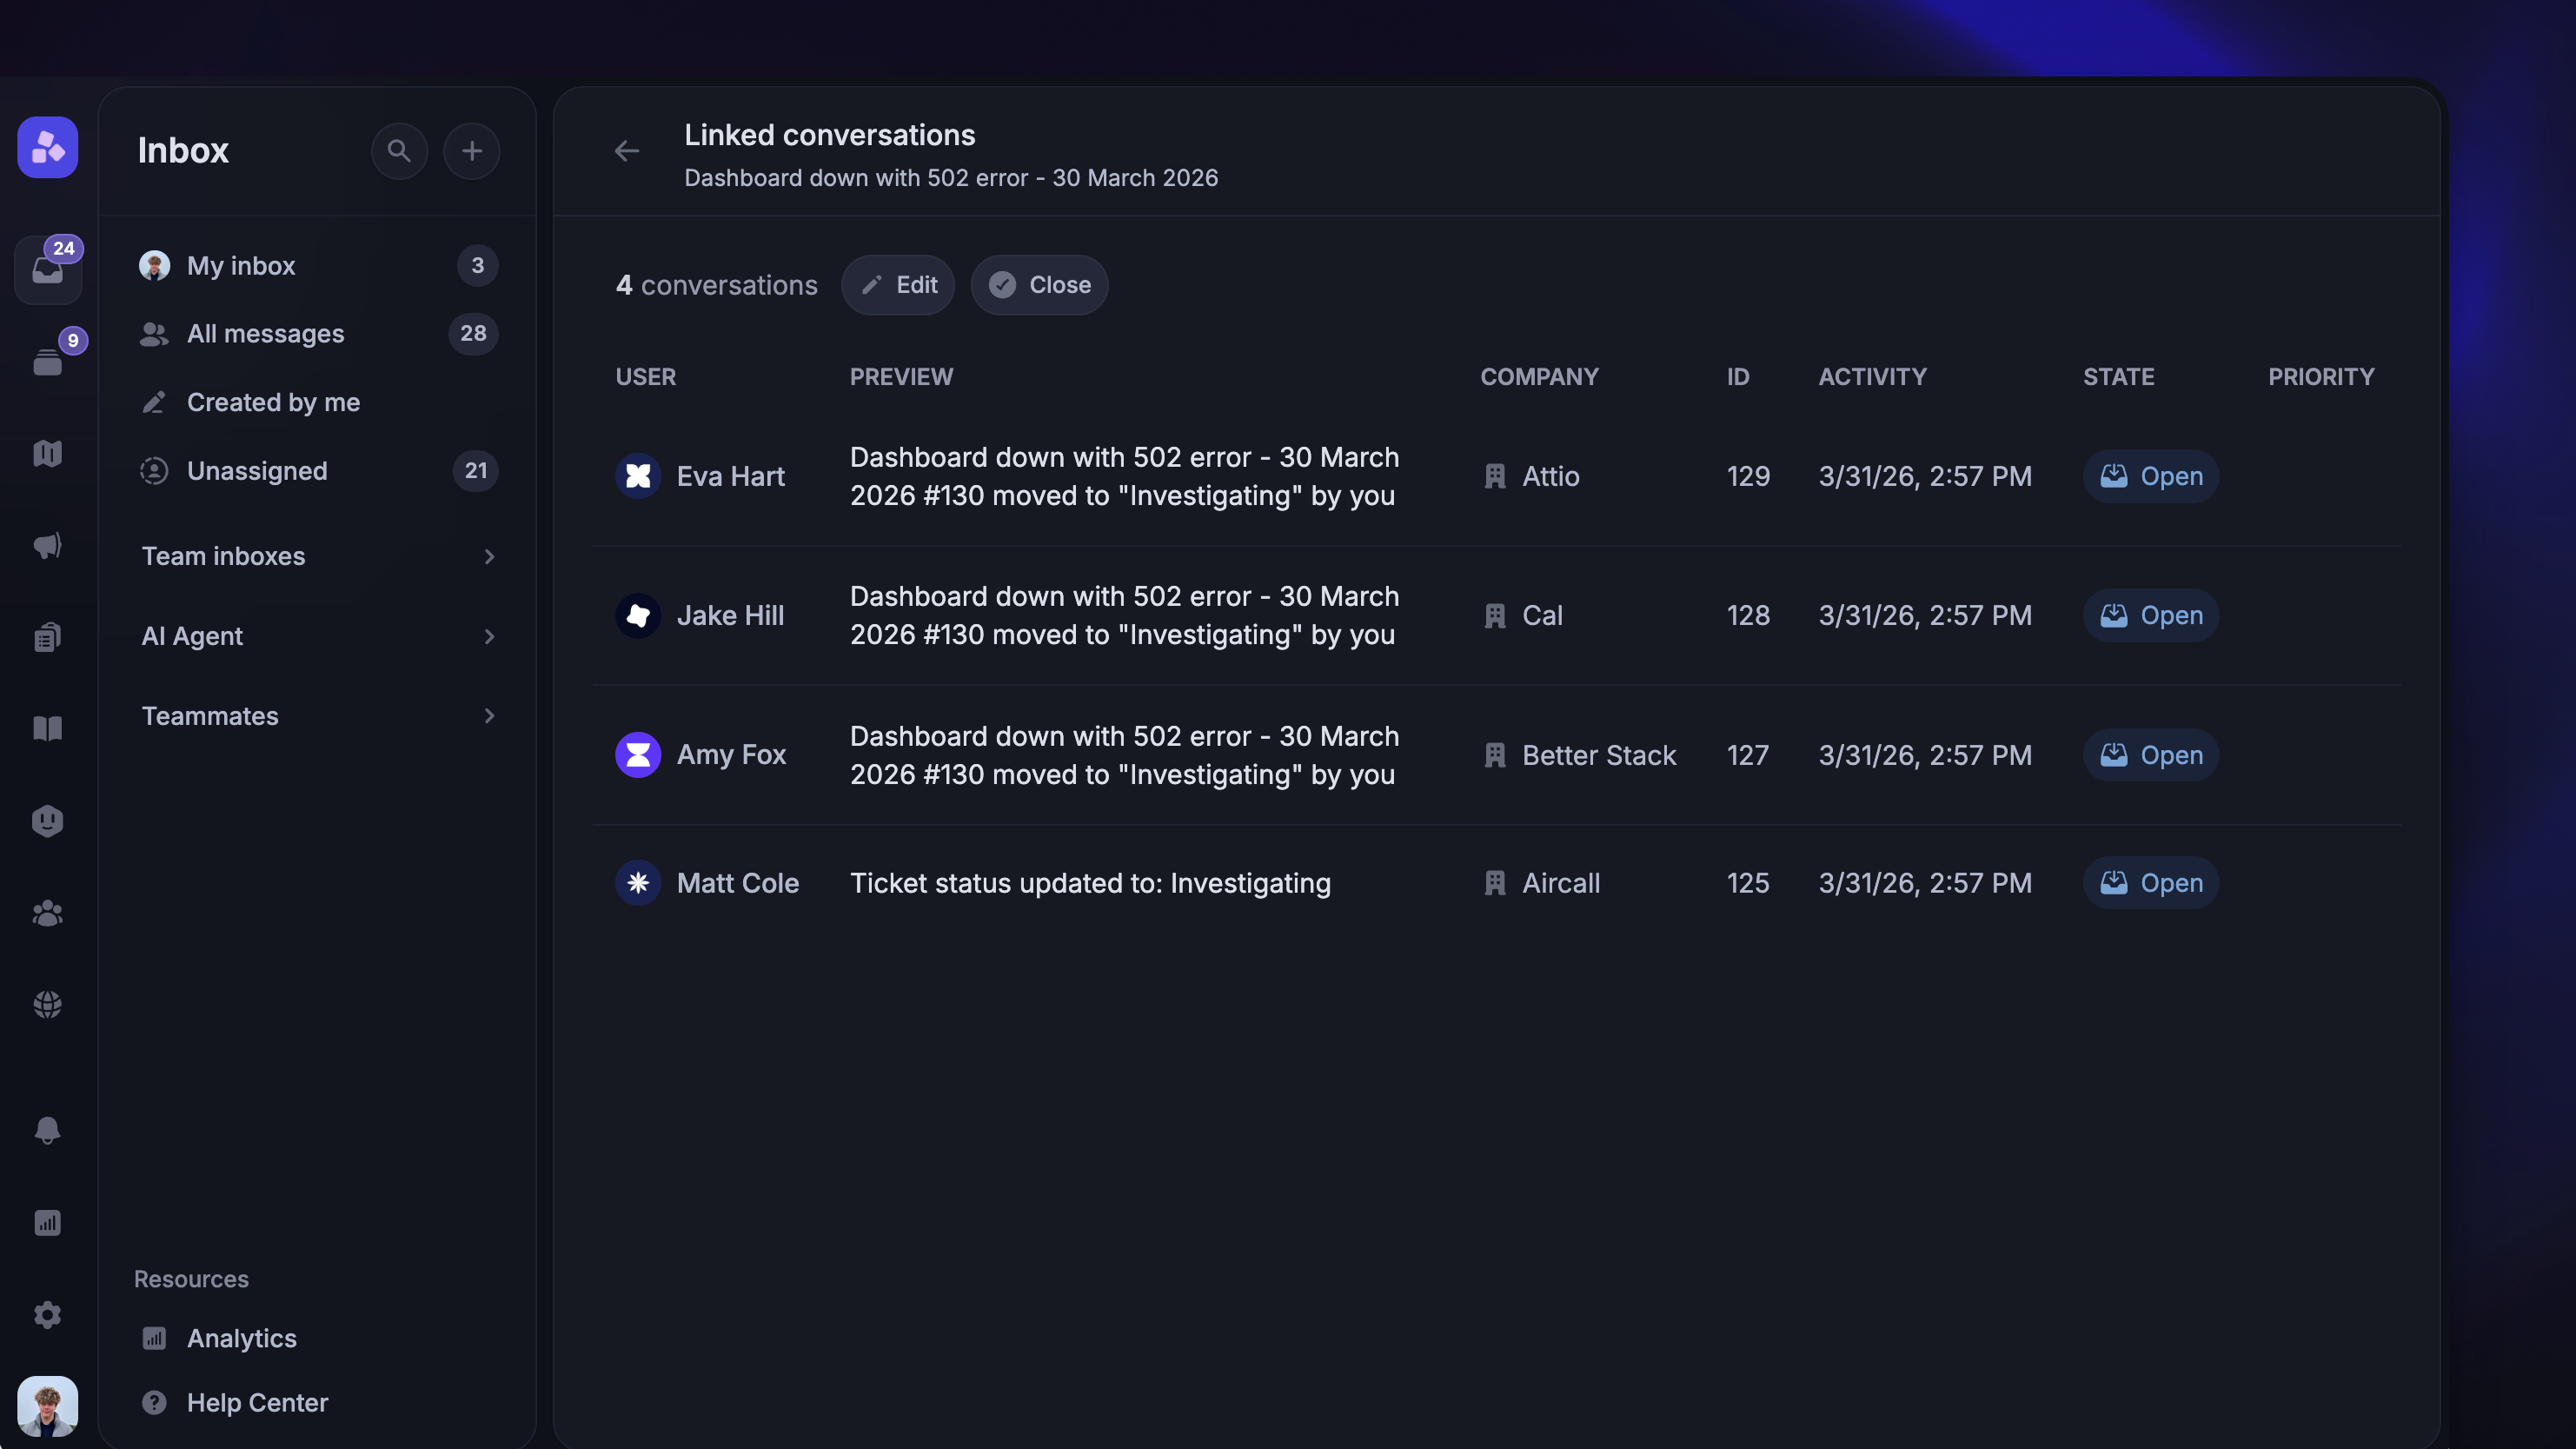
The Linked conversations section in the right-hand sidebar shows all conversations linked to a Tracker ticket. Up to 5 are shown directly – if there are more, click See all to open the full linked conversations view.
The linked conversations view shows a table with the user, preview, company, last activity, and conversation state for each linked conversation. From here you can:
Click any row to open the conversation in a slideover panel
Edit – opens a bulk update modal where you can send a reply or internal note and apply actions (assign, snooze, prioritize, close) to all linked conversations at once
Close – closes all linked conversations. You'll be prompted to pick a resolved state for the Tracker ticket before closing
Unlinking a Tracker ticket
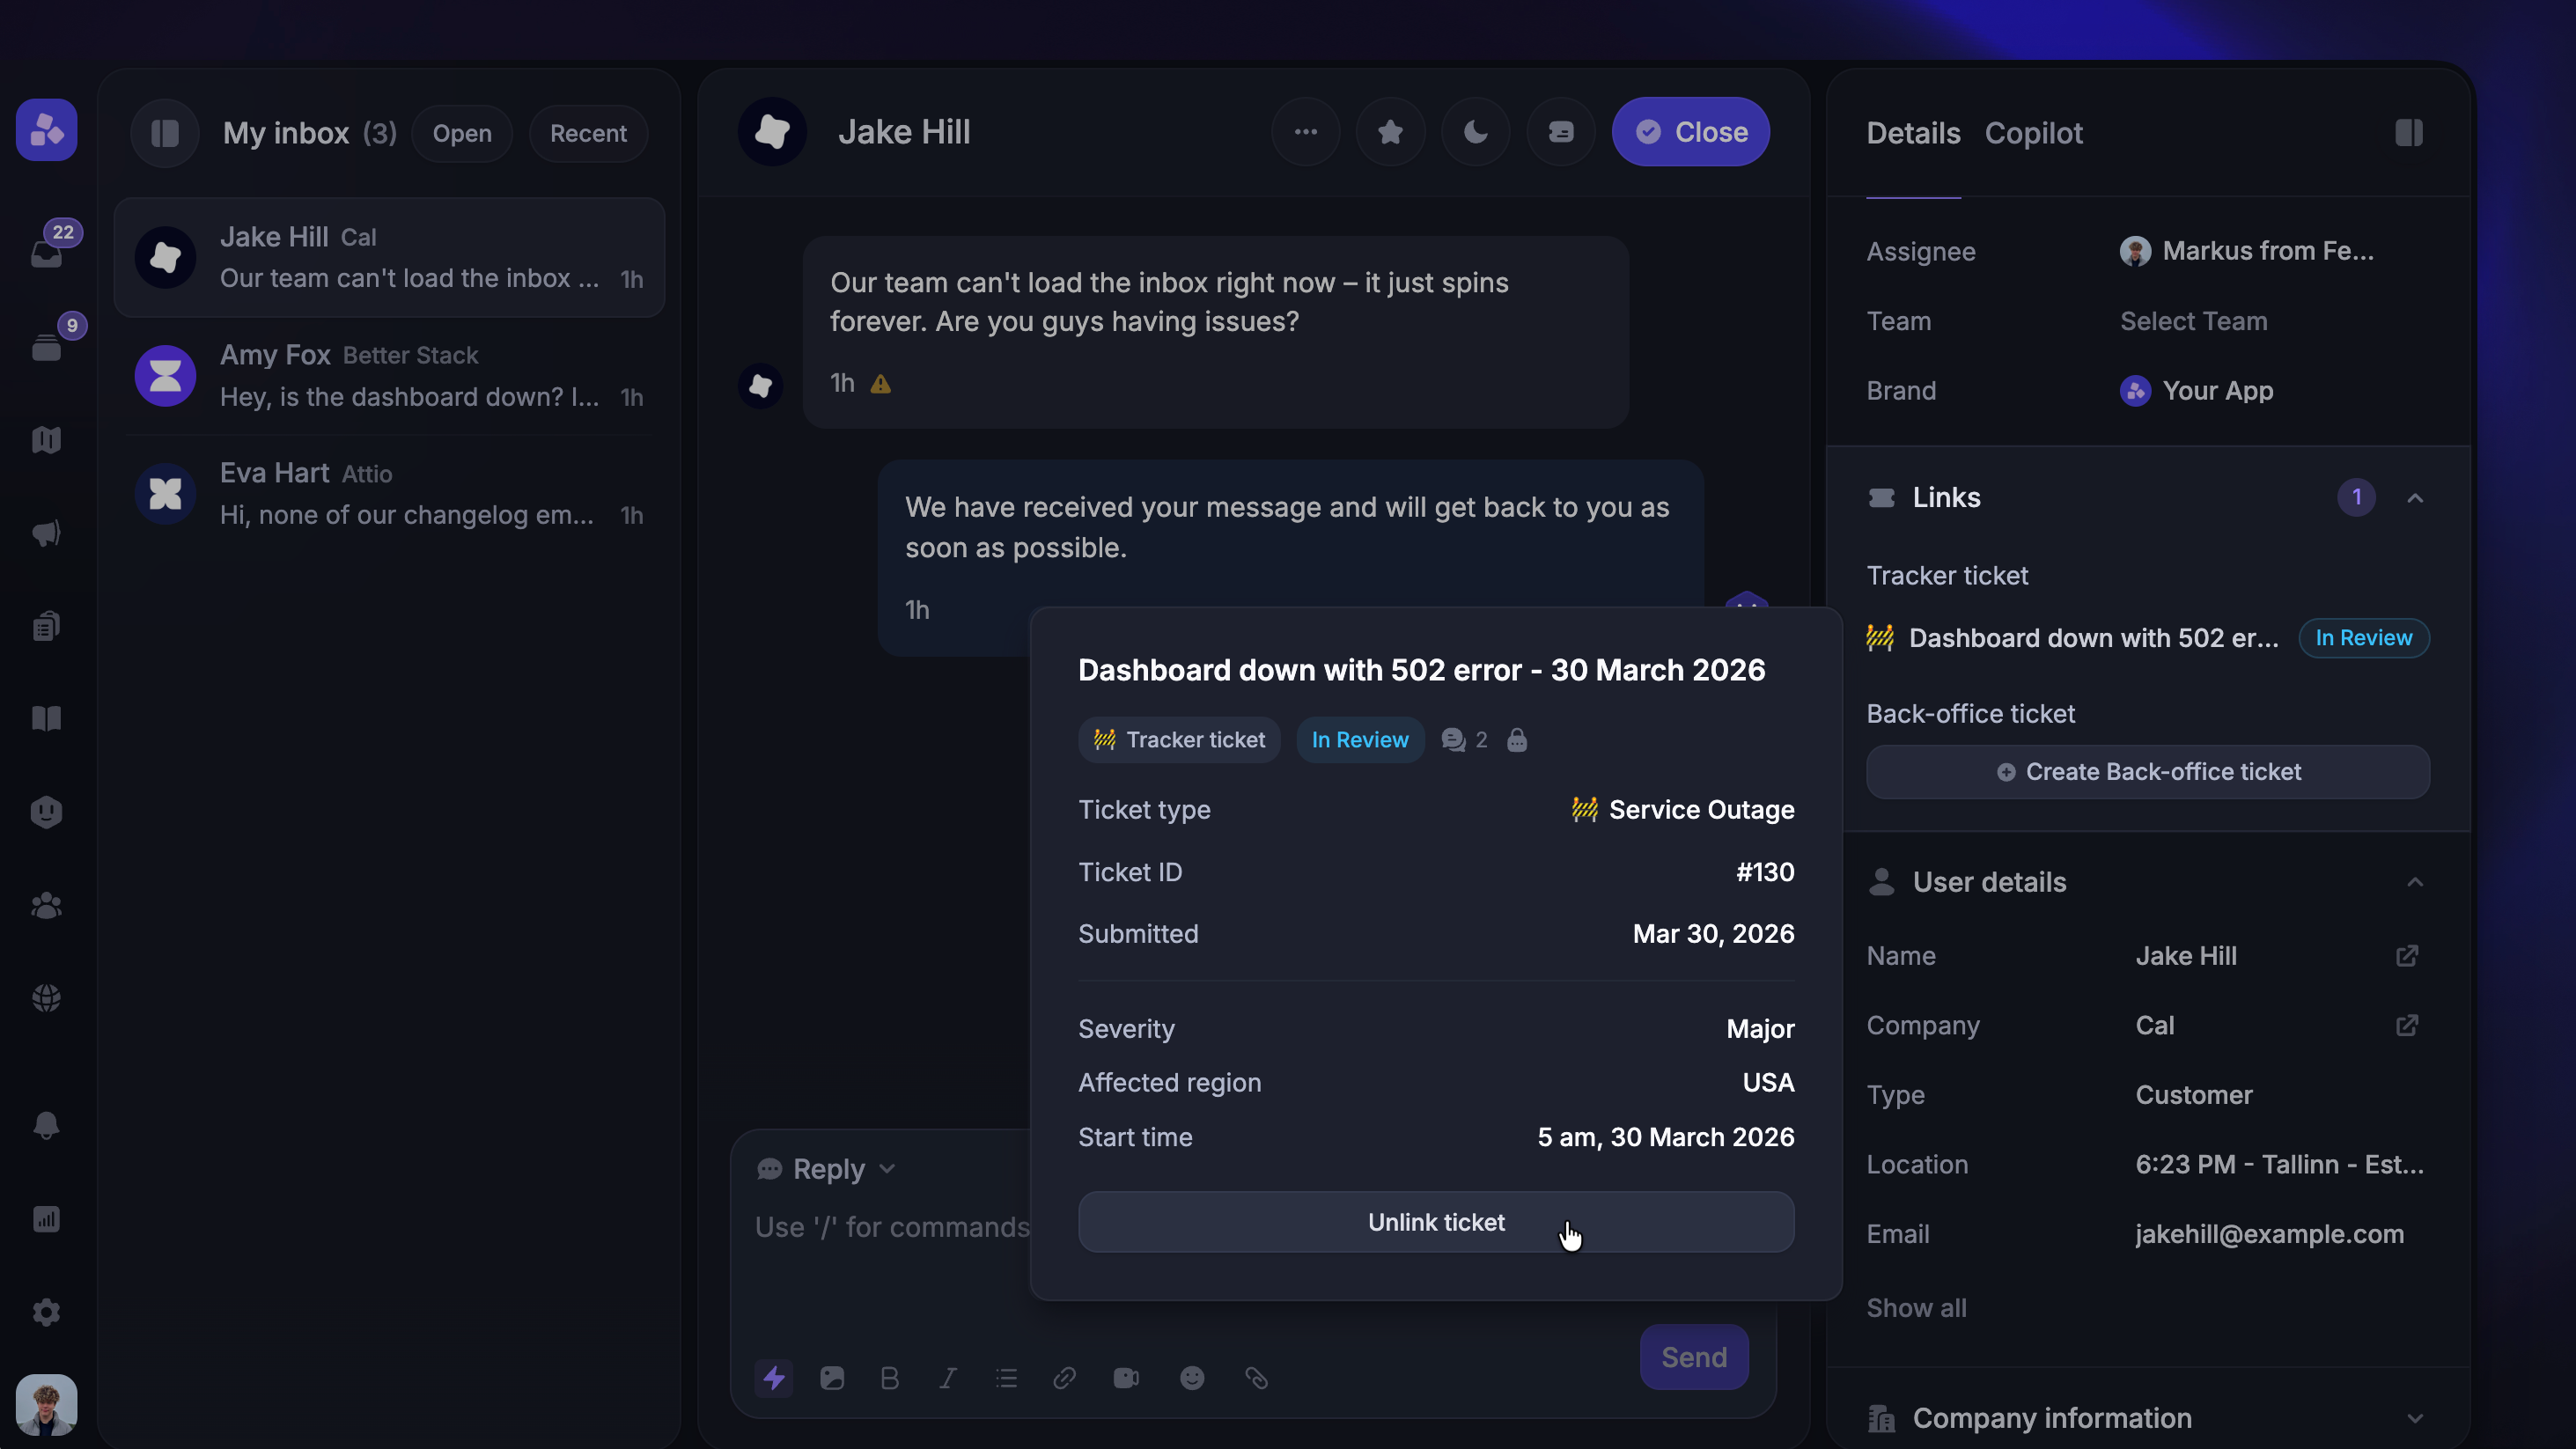
If a conversation was linked to a Tracker ticket by mistake, you can unlink it from the ticket preview in the conversation's right-hand sidebar by hovering over the ticket.
Unlinking removes the connection but does not delete the Tracker ticket or the conversation.