Service Level Agreements (SLAs)
Hit consistent response times, prioritize the right customers, and measure your performance using SLAs in Workflows.
Written By Markus from Featurebase
Last updated 3 months ago
Overview
SLAs (Service Level Agreements) are targets that help your team reply, close, and resolve conversations on time. They help you deliver a consistent, high-quality support experience, especially when you have:
Urgent conversations that should jump the queue
VIP customers with agreed response times
High-value leads that Sales should reply to quickly
Internal goals you want to track (and improve)
SLAs are activated only through workflows, but you can view and manage them from Settings → Support → SLA Policies.
Create a workflow to set SLAs
SLAs are configured inside Workflows. That’s where you decide when and to whom an SLA applies.
1. Create a workflow
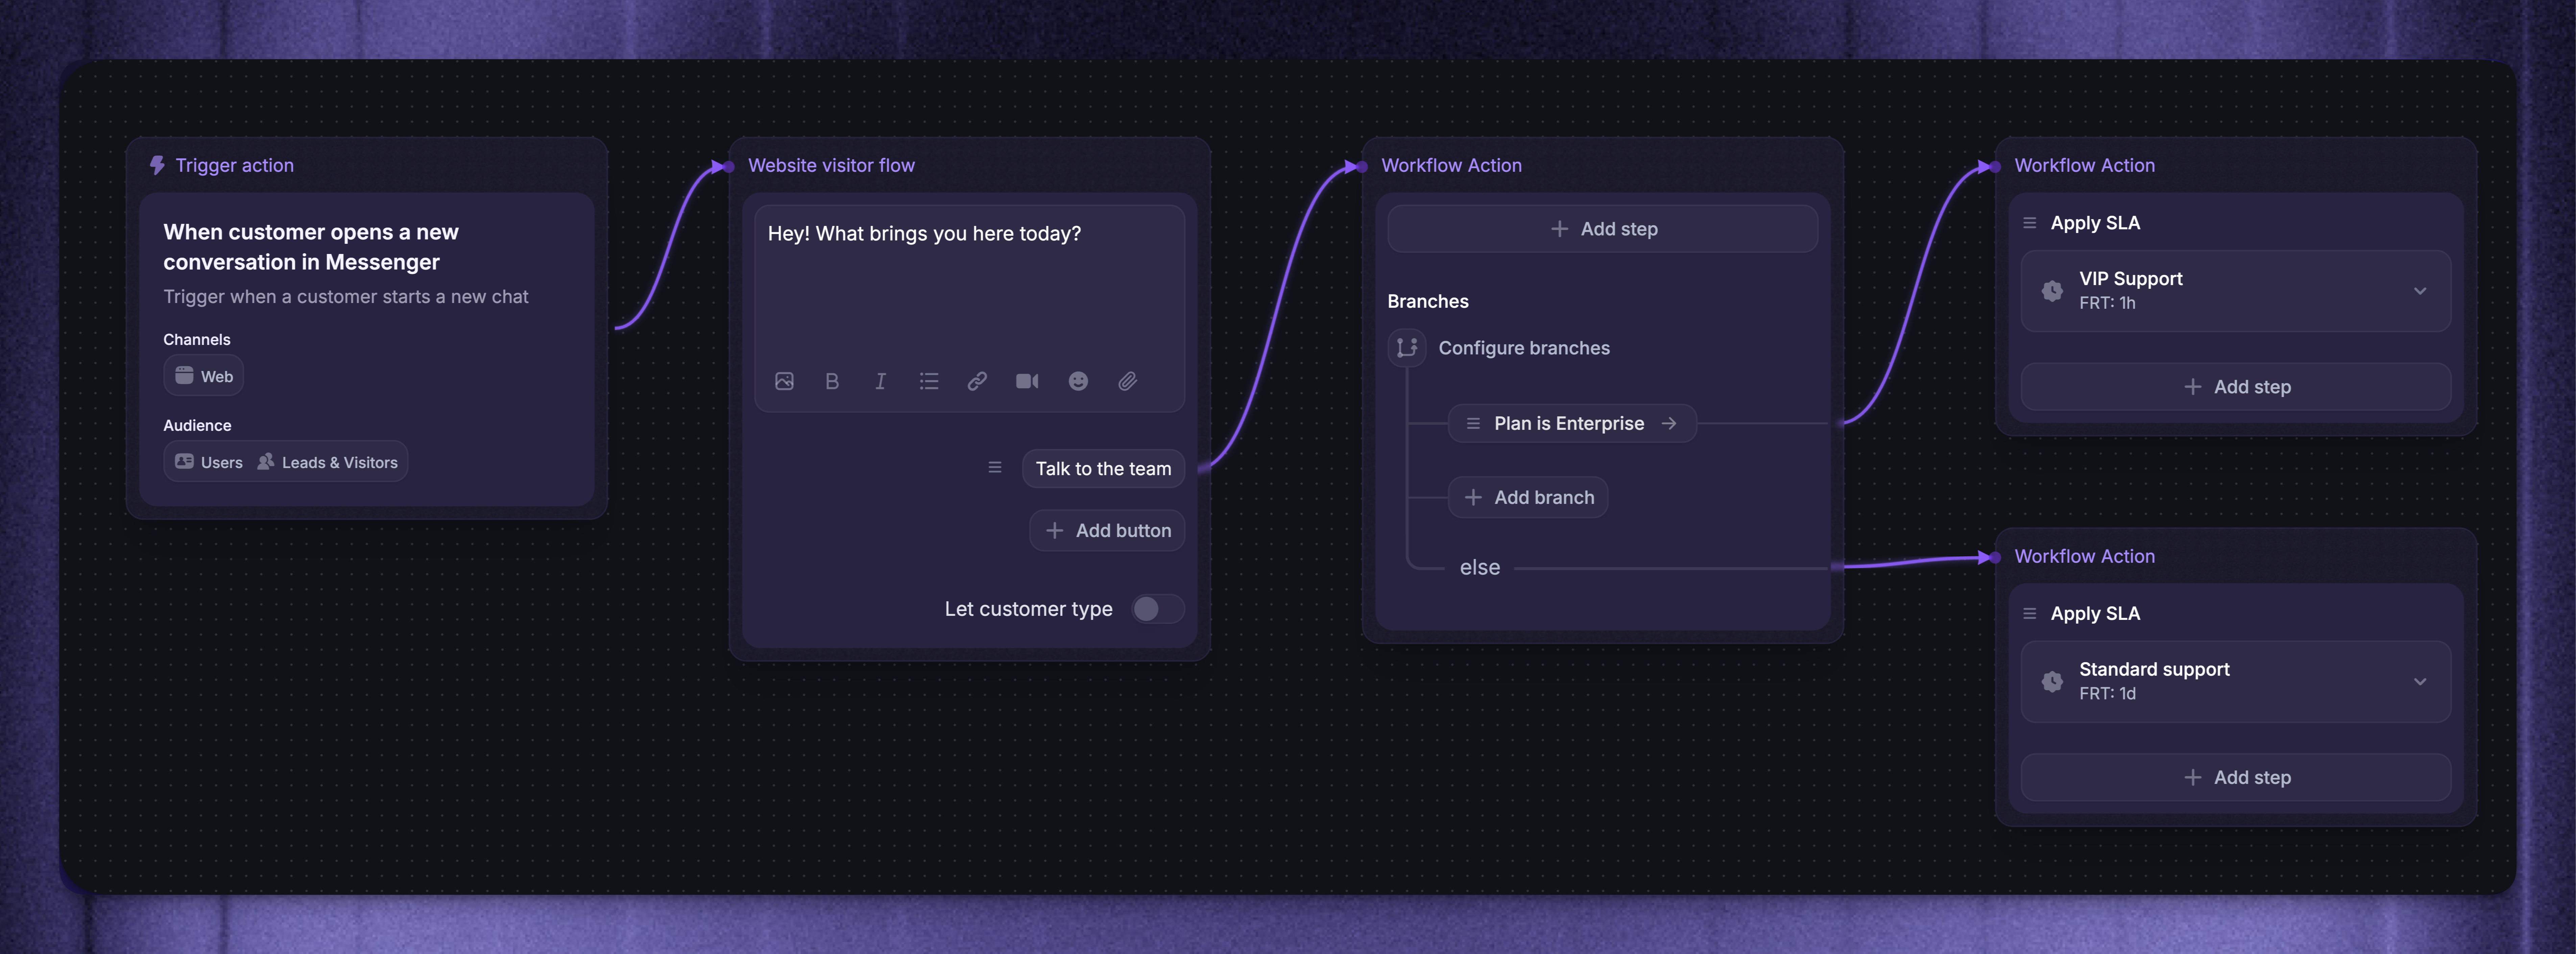
First, create a Workflow to control exactly when an SLA is applied and which users it applies to:
Start by creating a new Workflow from Automations → Workflows
Select a trigger (e.g. Customer opens a new conversation in the Messenger)
Set conditional branching to apply different SLAs for different users (optional)
Add the ‘Apply SLA’ block to the path where you want the SLA applied
NB! Multiple Workflows with the same trigger and audience can override each other, so make sure only one Workflow will match your SLA rules.
2. Configure the SLA rule

You can now set up individual SLA rules for different customers. For each SLA, you can configure targets like:
First response time (FRT) - the time it should take a teammate to reply to the first message in a conversation that matches your rule
Next response time (NRT) - the time it should take a teammate to reply to each subsequent customer reply
Time to close (TTC) - the total time allowed until the conversation should be closed
You can also choose to pause SLAs when a conversation is snoozed. This prevents SLA breaches while you’re intentionally not working on a conversation (e.g. when waiting on a customer or temporarily setting something aside).
Common SLA examples
Here are some typical SLA setups used by SaaS companies to get you started (all times are meant to be inside your office hours):
Standard SaaS supportBalances fast acknowledgment with reasonable resolution times.
FRT: 1–4 hours
TTC: 2–5 days
Live chat (in-app messenger)
Used when customers expect near real-time replies.
FRT: 5–15 minutes
VIP / Enterprise customer support
Used when response times are part of a contract or expectation.
FRT: 15–60 minutes
TTC: 1–2 days
Sales and high-value leads
Speed matters more than formal resolution tracking.
FRT: 5–30 minutes
Bug reports & technical issues
Resolution matters more than fast back-and-forth replies.
FRT: 4–8 hours
TTR: 2–10 days (often severity-based)
How SLAs work
SLAs are applied based on the most recent customer message at the moment the SLA is triggered. Messages sent before or after that do not affect the SLA start time.
For example:
09:00 – User message
09:05 – User message (used by SLA to measure response time)
09:06 – (Workflow matches and applies an SLA)
09:10 – User message (NOT used by SLA to measure response time)
Inbox experience
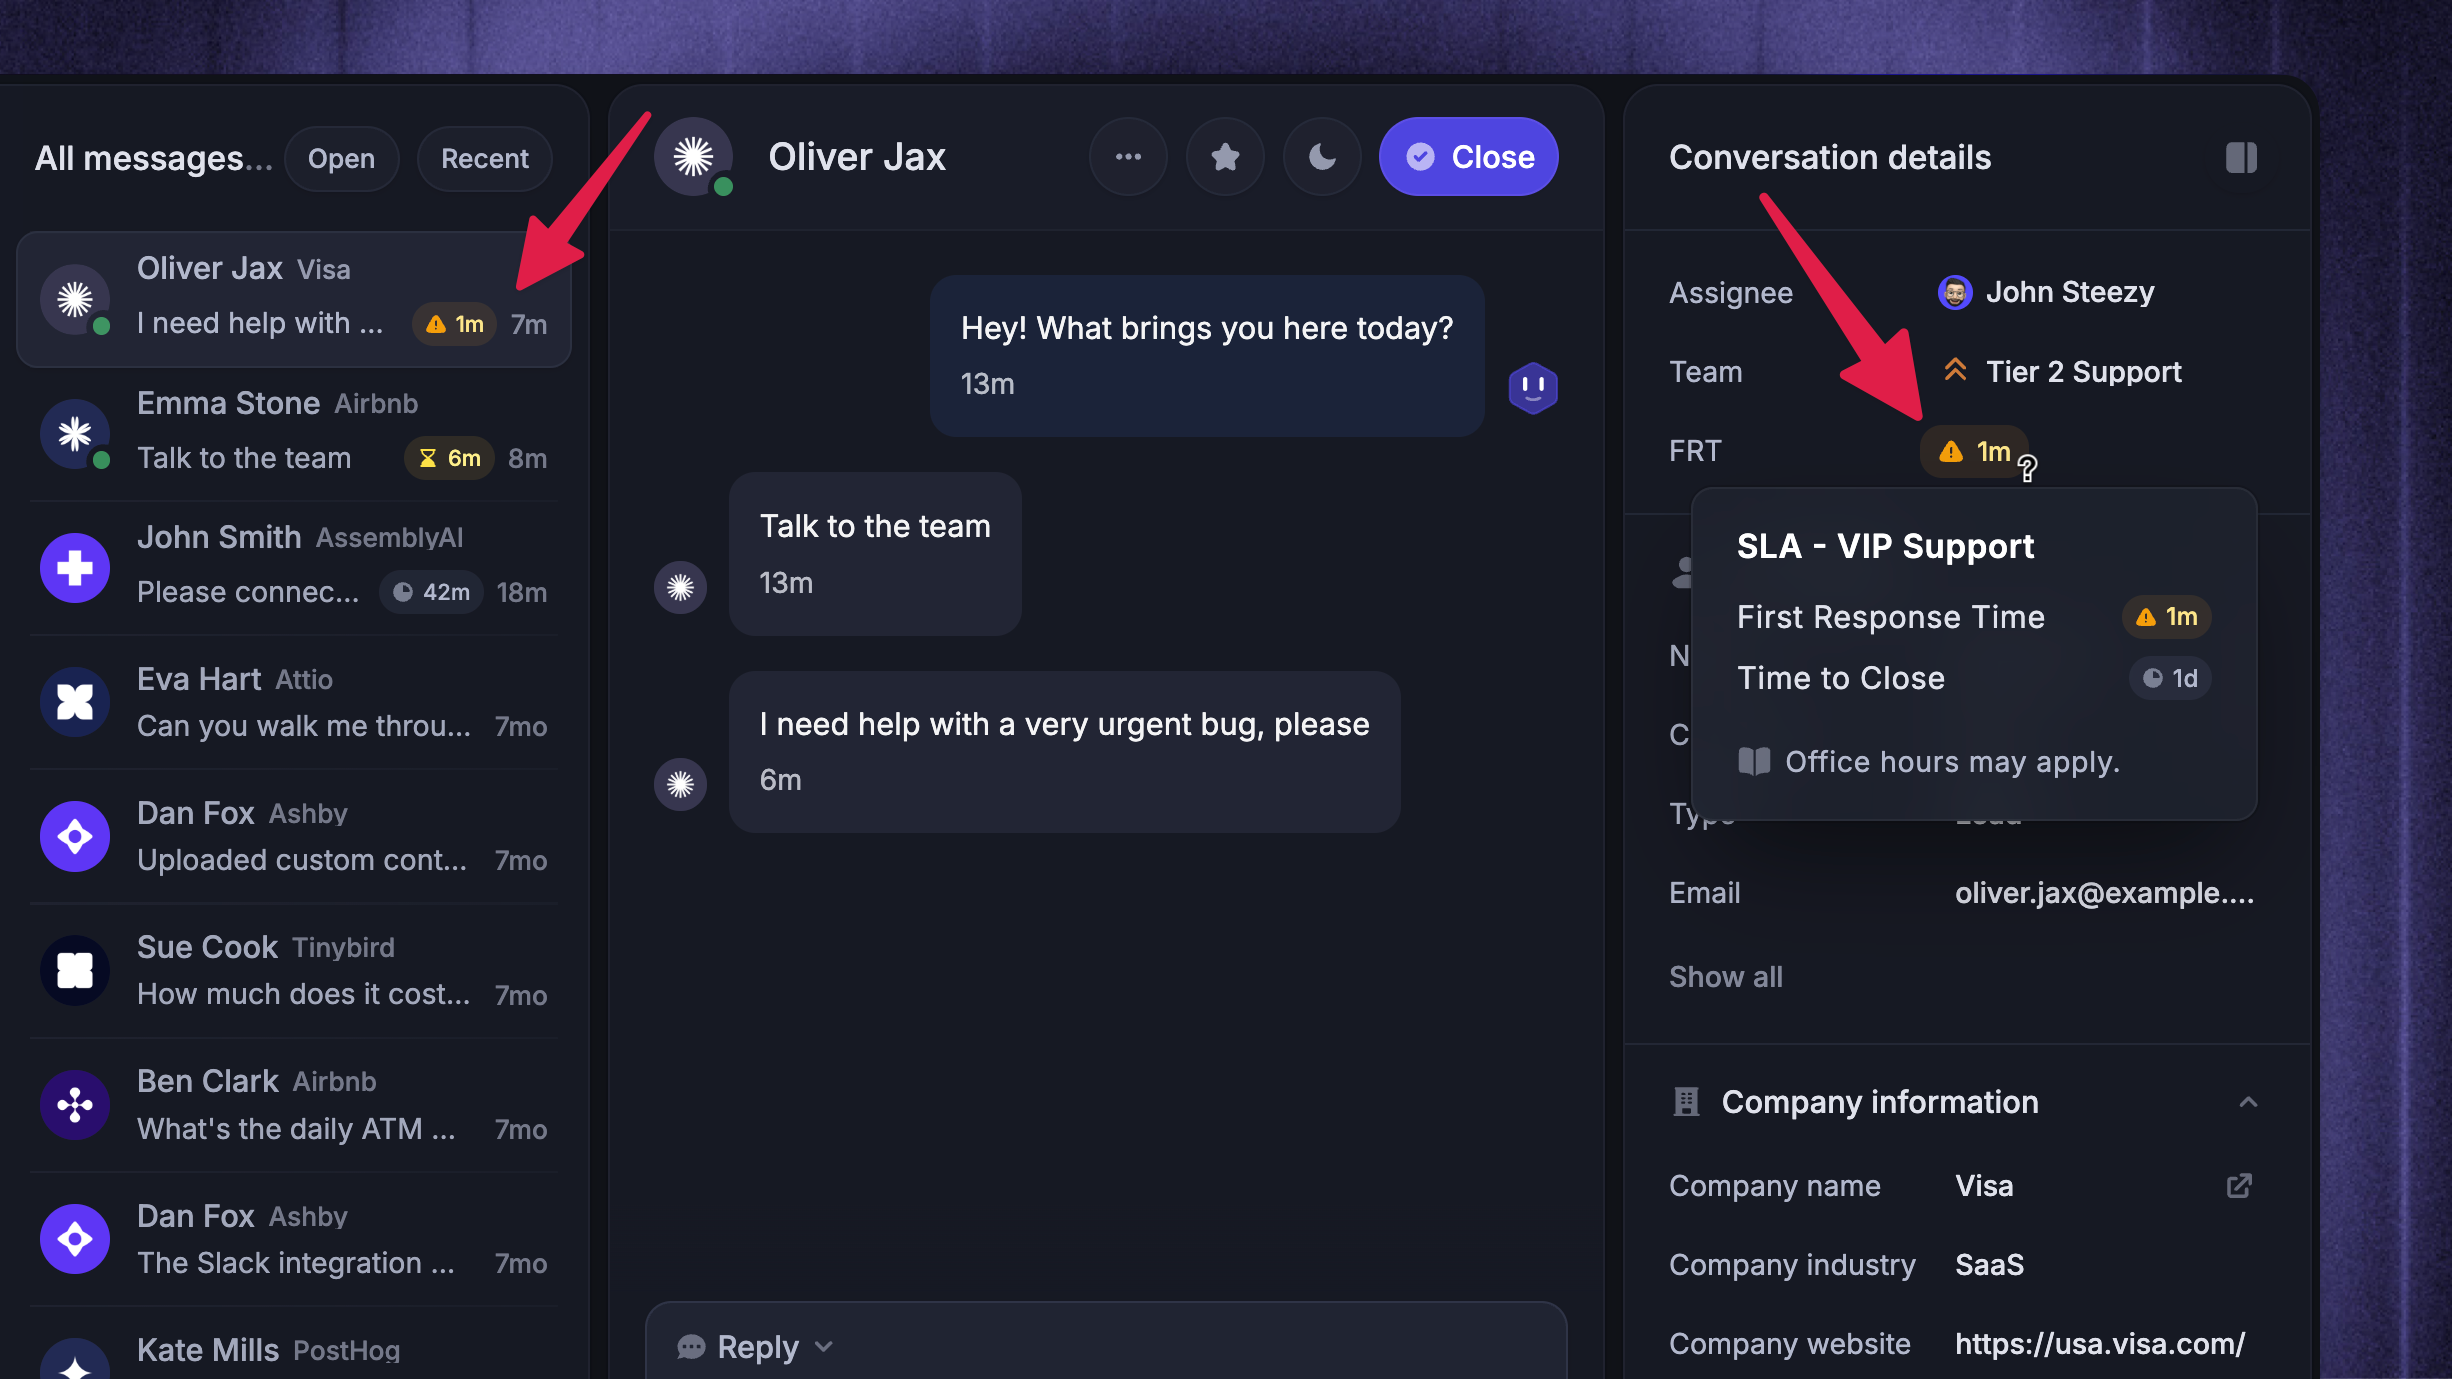
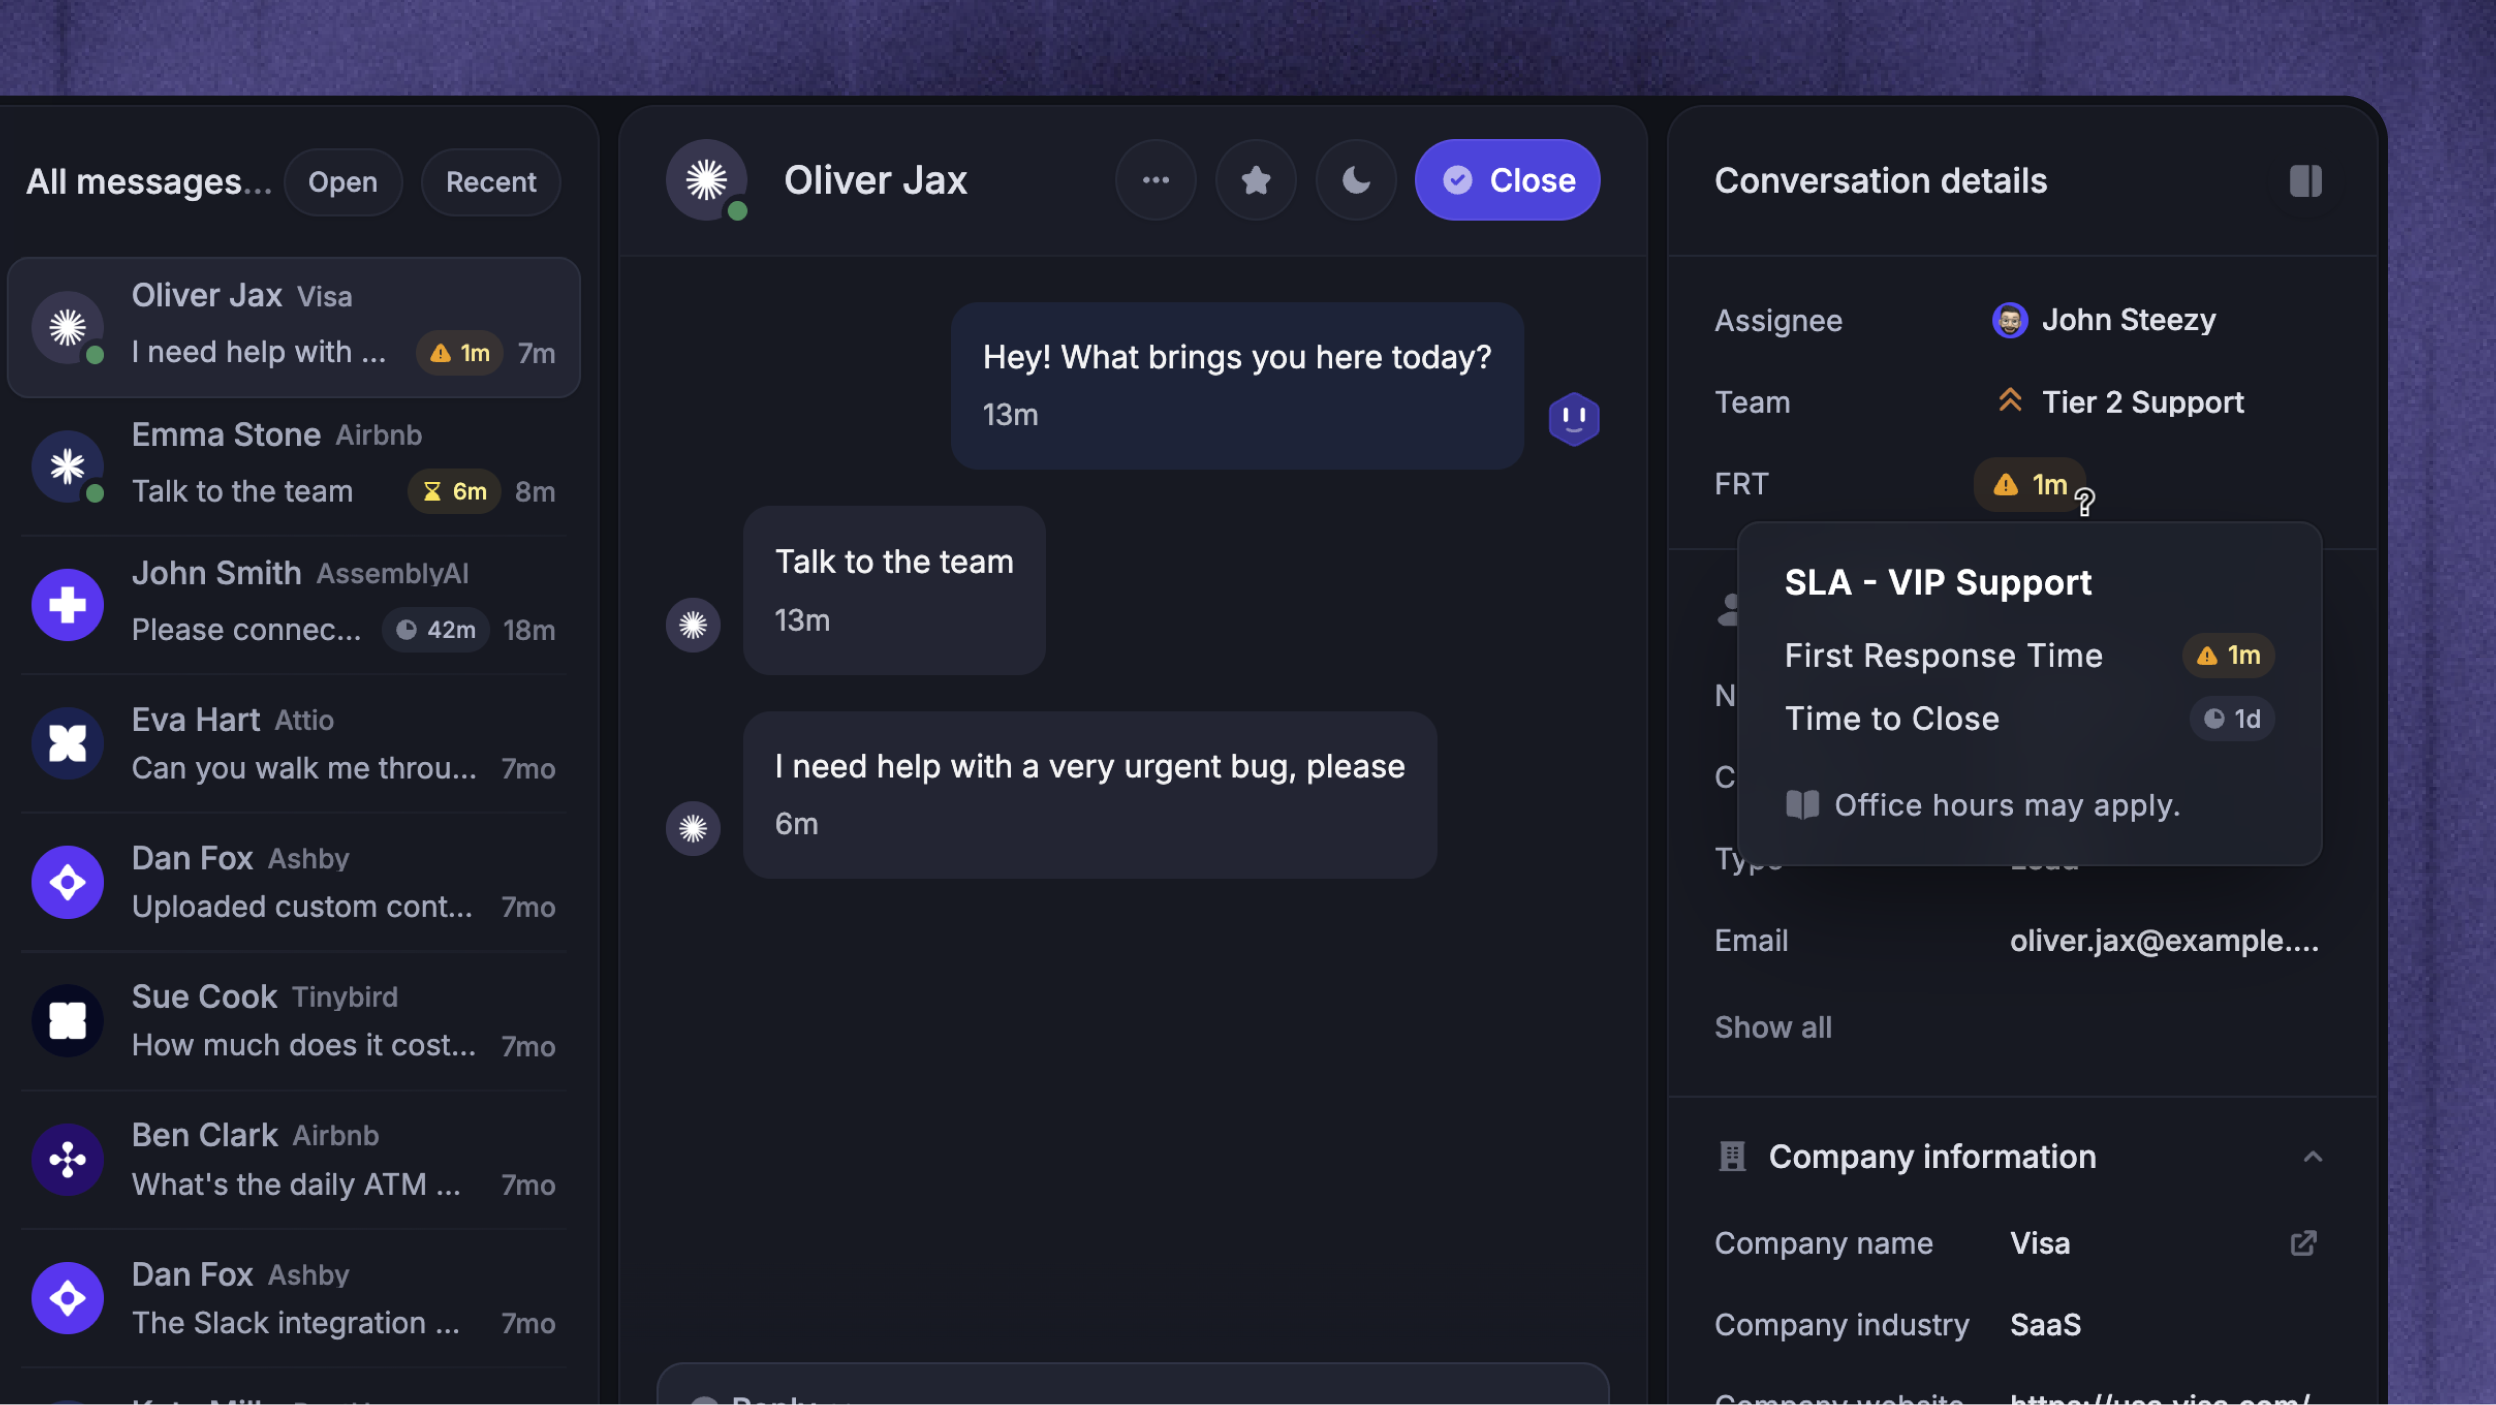
When an SLA is applied, you’ll see the nearest SLA target directly in the inbox. You’ll also see other SLA details for this conversation in the right-hand sidebar.
The SLA target will continue to count down until you reply. If you haven’t replied within the SLA target, its status will change to red.
SLA indicator colors:
Red - overdue
Orange - less than 5 minutes left
Yellow - less than 15 minutes left
Grey - more than 15 minutes left
Tip: You can sort your inbox by ‘SLA breach soonest’ to work the most urgent items first.
SLAs and office hours
SLAs and office hours work together in Featurebase to ensure timely customer support while respecting your team’s working schedule. SLAs automatically adapt to your configured office hours and holidays, so response targets are measured only when your team is actually available.
If a customer message arrives outside office hours, the SLA clock effectively starts at the beginning of the next working day.
If there isn’t enough time left in the current working day to meet an SLA target, the remaining time carries over into the next working day.
This prevents SLAs from being breached while your team is offline.
How office hours affect SLA timers
SLA timers always run in the background, but they’re mapped to your office hours:
Messages received outside office hours don’t consume SLA time immediately
If an SLA target can’t be met before office hours end, the timer resumes when office hours start again
The expected response time shown in the inbox may include nights, weekends, or holidays, depending on your office hours setup
Default office hours settings
By default, 1 calendar day equals 24 hours.
If office hours are limited (for example, 9am–5pm, Monday to Friday), calendar time is divided by the number of working hours per day.
An 8-hour workday divides a 24-hour SLA day into 3 working days.
SLAs always reflect your team’s actual availability.
Examples
Scenario 1: Short SLA near the end of the day
Office hours: 10am–6pm, Monday to Friday
First response time SLA: 15 minutes
Customer message arrives at 4:50pm on Friday
The expected response time becomes 10:05am on Monday, since only 10 minutes of office hours remained on Friday.
Scenario 2: “One day” SLA spanning multiple calendar days
Let’s consider the following setup:
Office hours: 9am–5pm, Monday to Friday
First response time SLA: 1 day (24 working hours)
Customer message arrives at 4:55pm on Friday
The remaining SLA time is spread across Monday, Tuesday, and Wednesday office hours. As a result, the inbox may show several calendar days remaining, even though the SLA target is only one working day.
Edit and delete SLAs
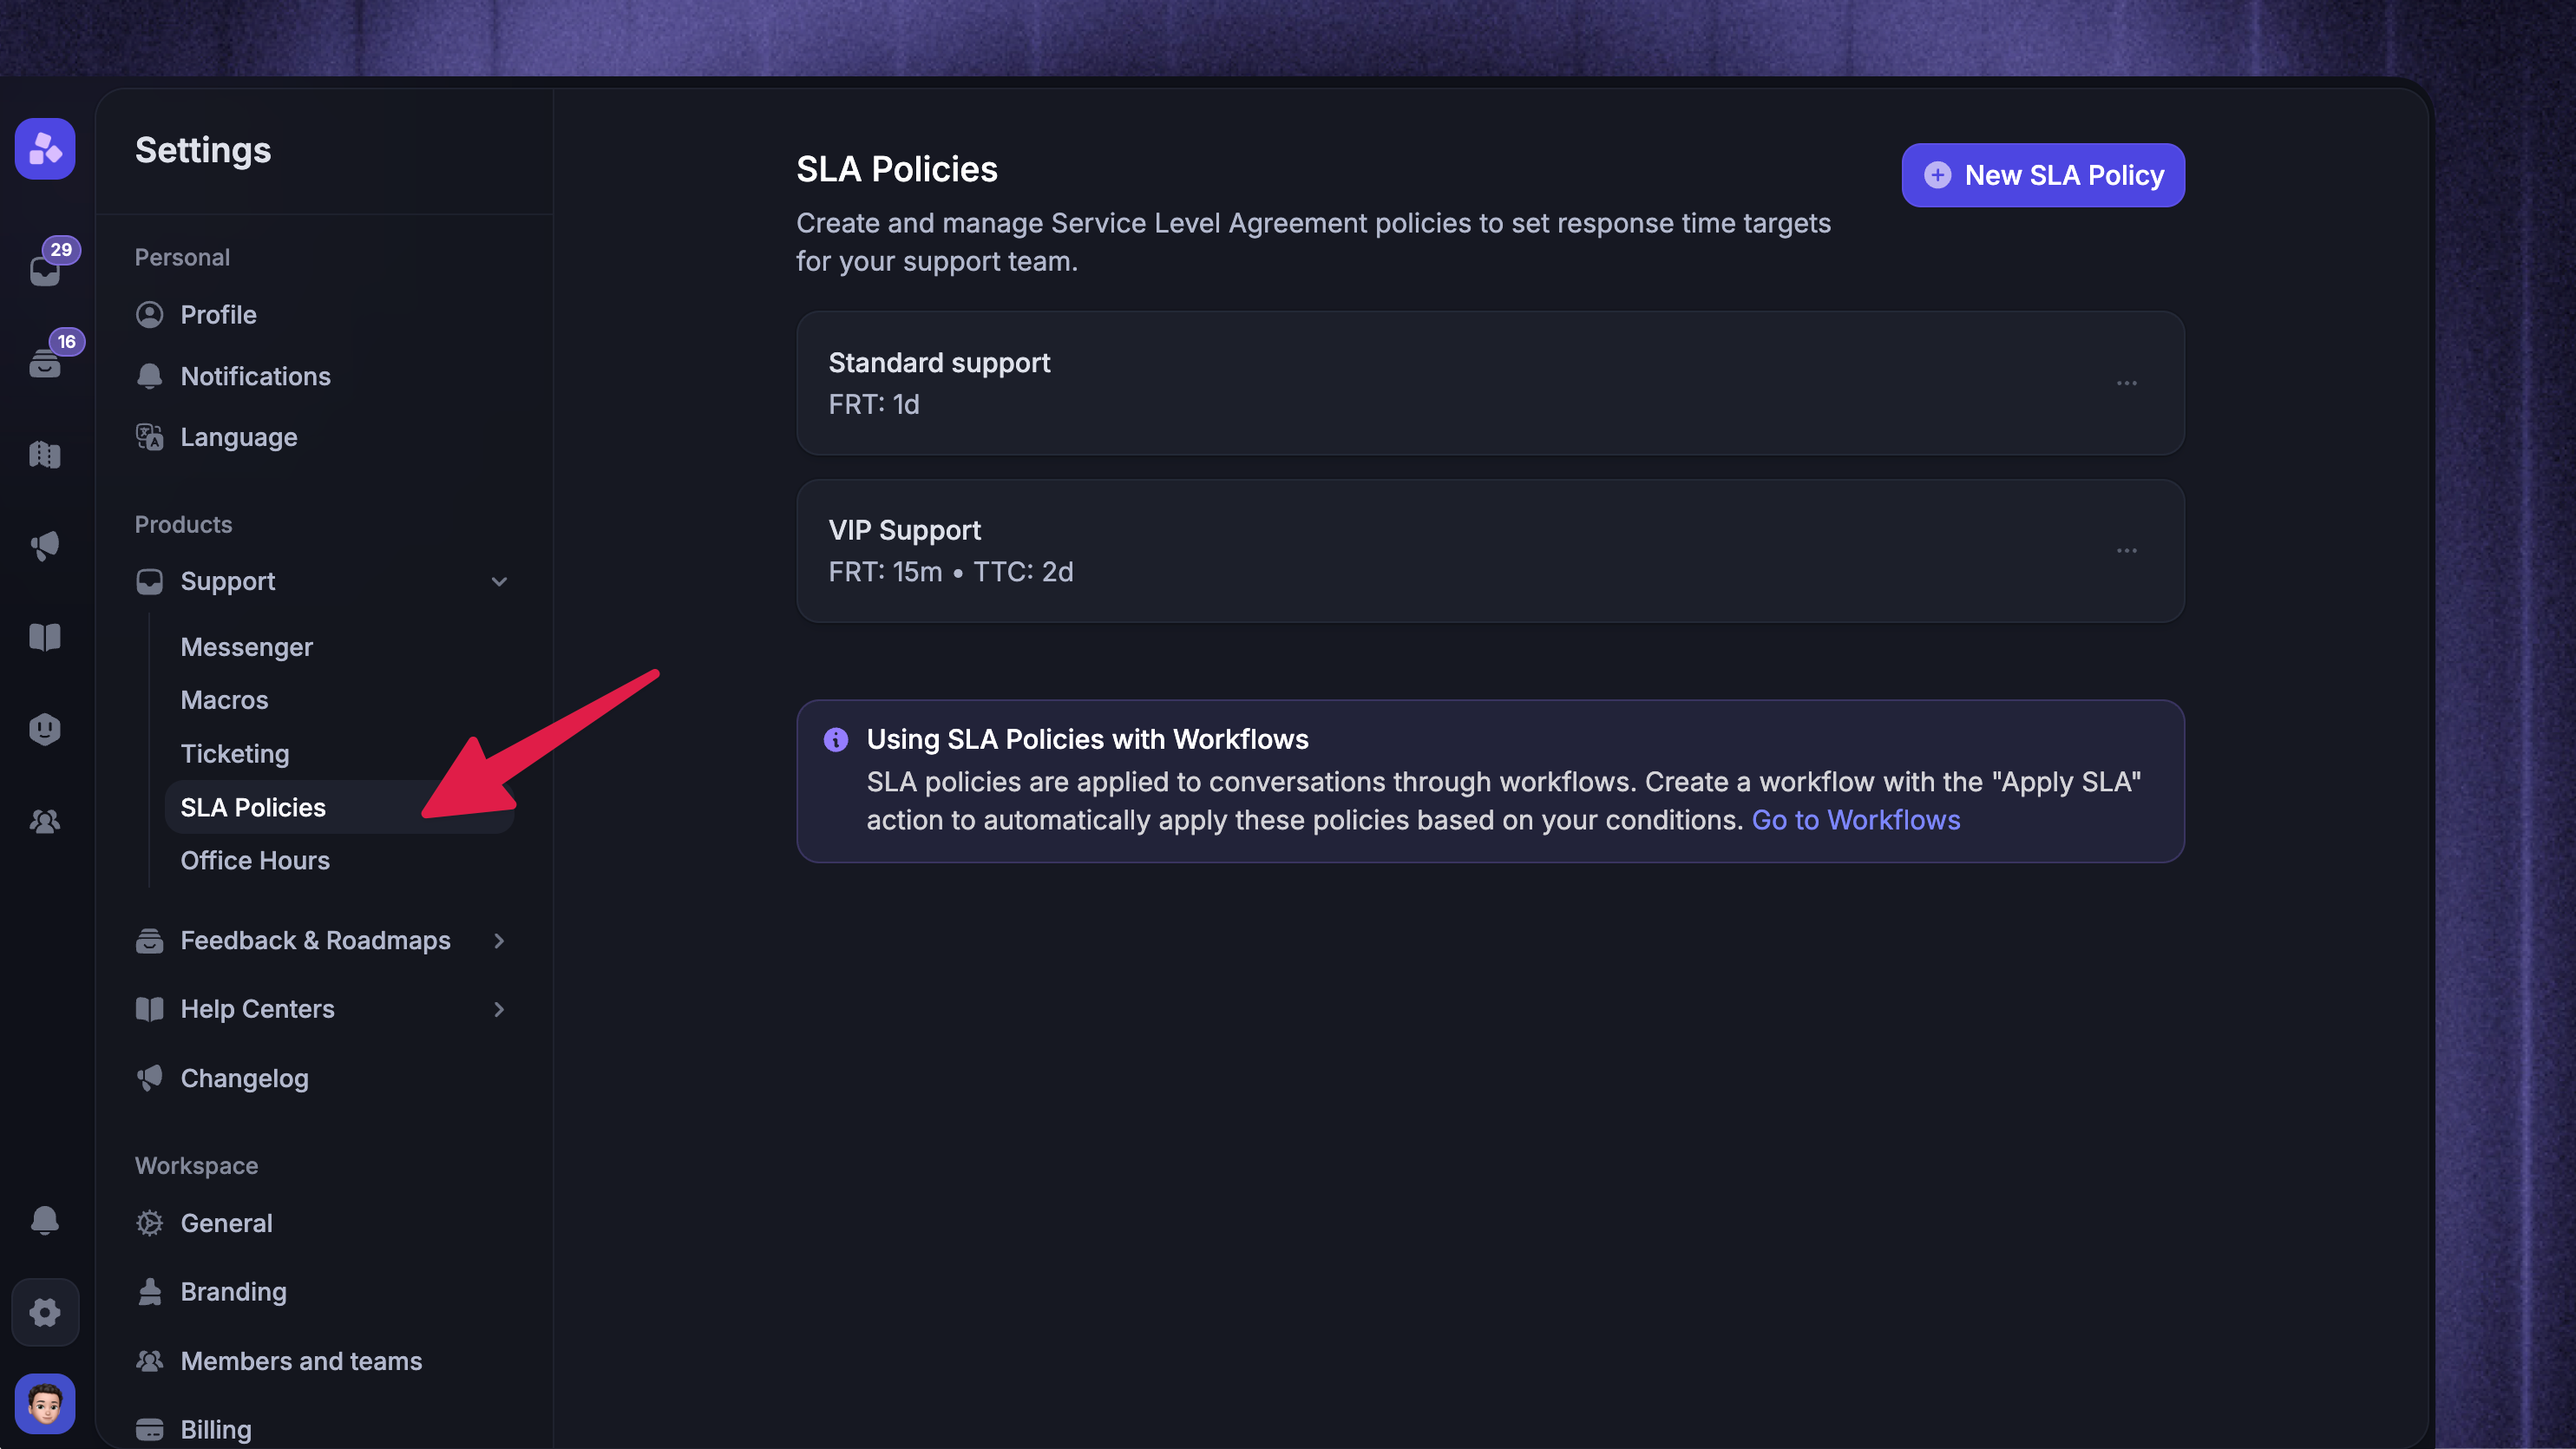
You can view all SLAs from Settings → Support → SLA Policies.
Here you can create, edit, and delete all of your SLA policies. However, you can only activate them through workflows.
If the SLA is used in any of your Workflows, it cannot be archived. You’ll see a warning with links to the Workflow(s) that are currently using this SLA.
NB! Deleted SLAs will not be visible in reports, or conversations, and cannot be restored.